Connect Your AI Client
Kortex MCP is in private beta. The connection details on this page are placeholders — the real endpoint is handed out when your beta invite arrives. Everything else here is accurate, so you can read ahead and turn up ready. Join the beta waitlist →
Copy-paste configuration for every major MCP client. Every one of them can connect by signing in, which needs nothing but a URL.
The snippets that carry kx_mcp_your_key_here are the API-key path, for clients or setups that cannot open a browser. Create your API key first, then replace that placeholder with it.
Pick your client
- Claude Code
- Claude Desktop / Web
- ChatGPT
- Cursor
- VS Code
- Antigravity
- Windsurf
- Cline
- Codex CLI
- Zed
One command. Your browser opens a Kortex consent page; sign in and you are connected.
claude mcp add --transport http kortex https://mcp.kortex-notebooklm.com/PLACEHOLDER-AT-LAUNCH
With an API key instead — for CI, or a machine with no browser. Same URL; the header is what selects the key path:
claude mcp add --transport http kortex \
  https://mcp.kortex-notebooklm.com/PLACEHOLDER-AT-LAUNCH \
  --header "Authorization: Bearer kx_mcp_your_key_here"
Both take Kortex as a custom connector: one URL and a sign-in, with no key to paste and no Node.js to install. The screens are the same in the desktop app and on the web.
Add the connector
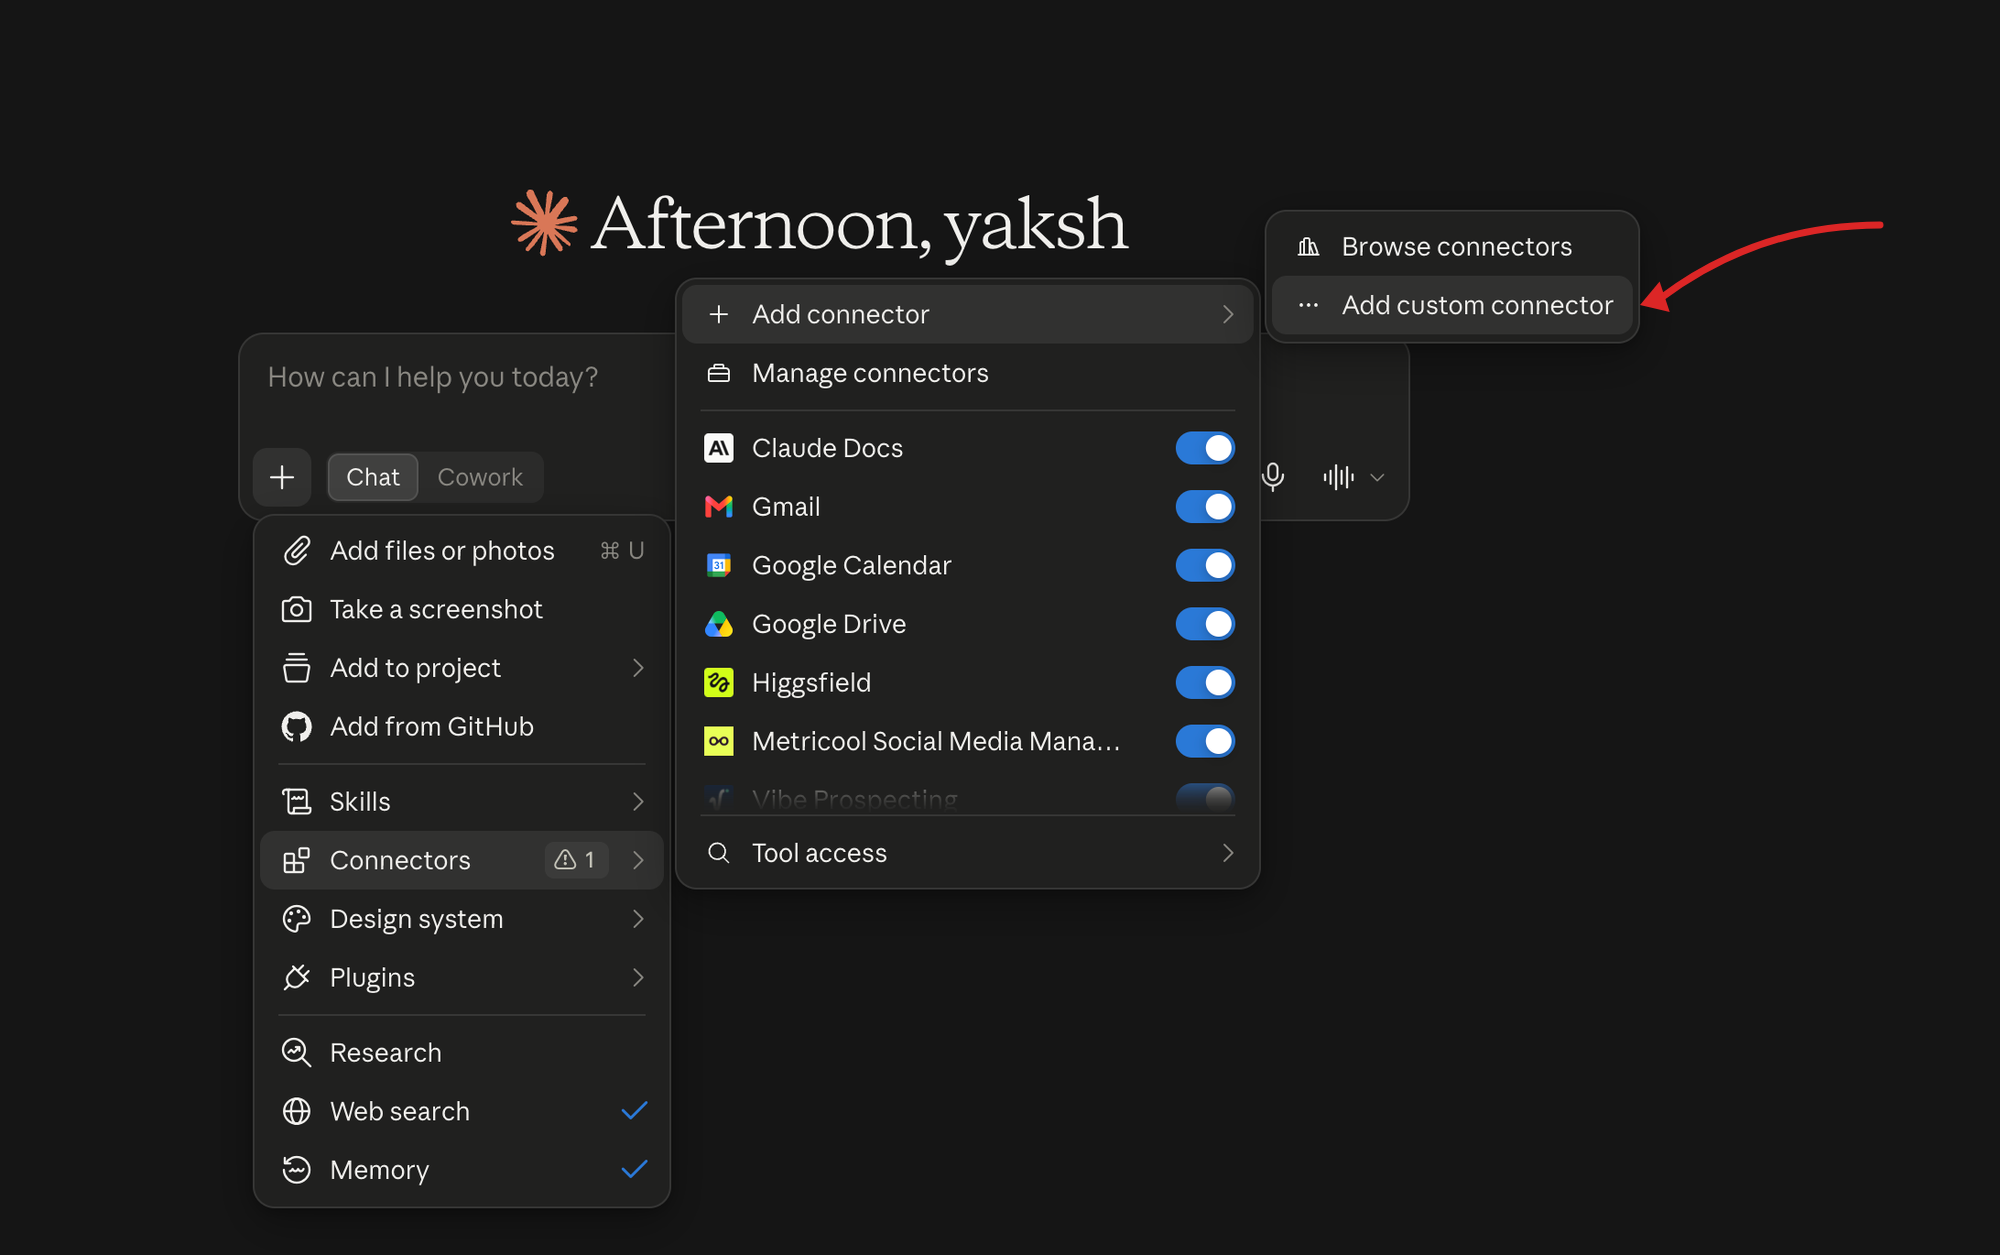
In the composer, open + → Connectors → Add connector → Add custom connector.
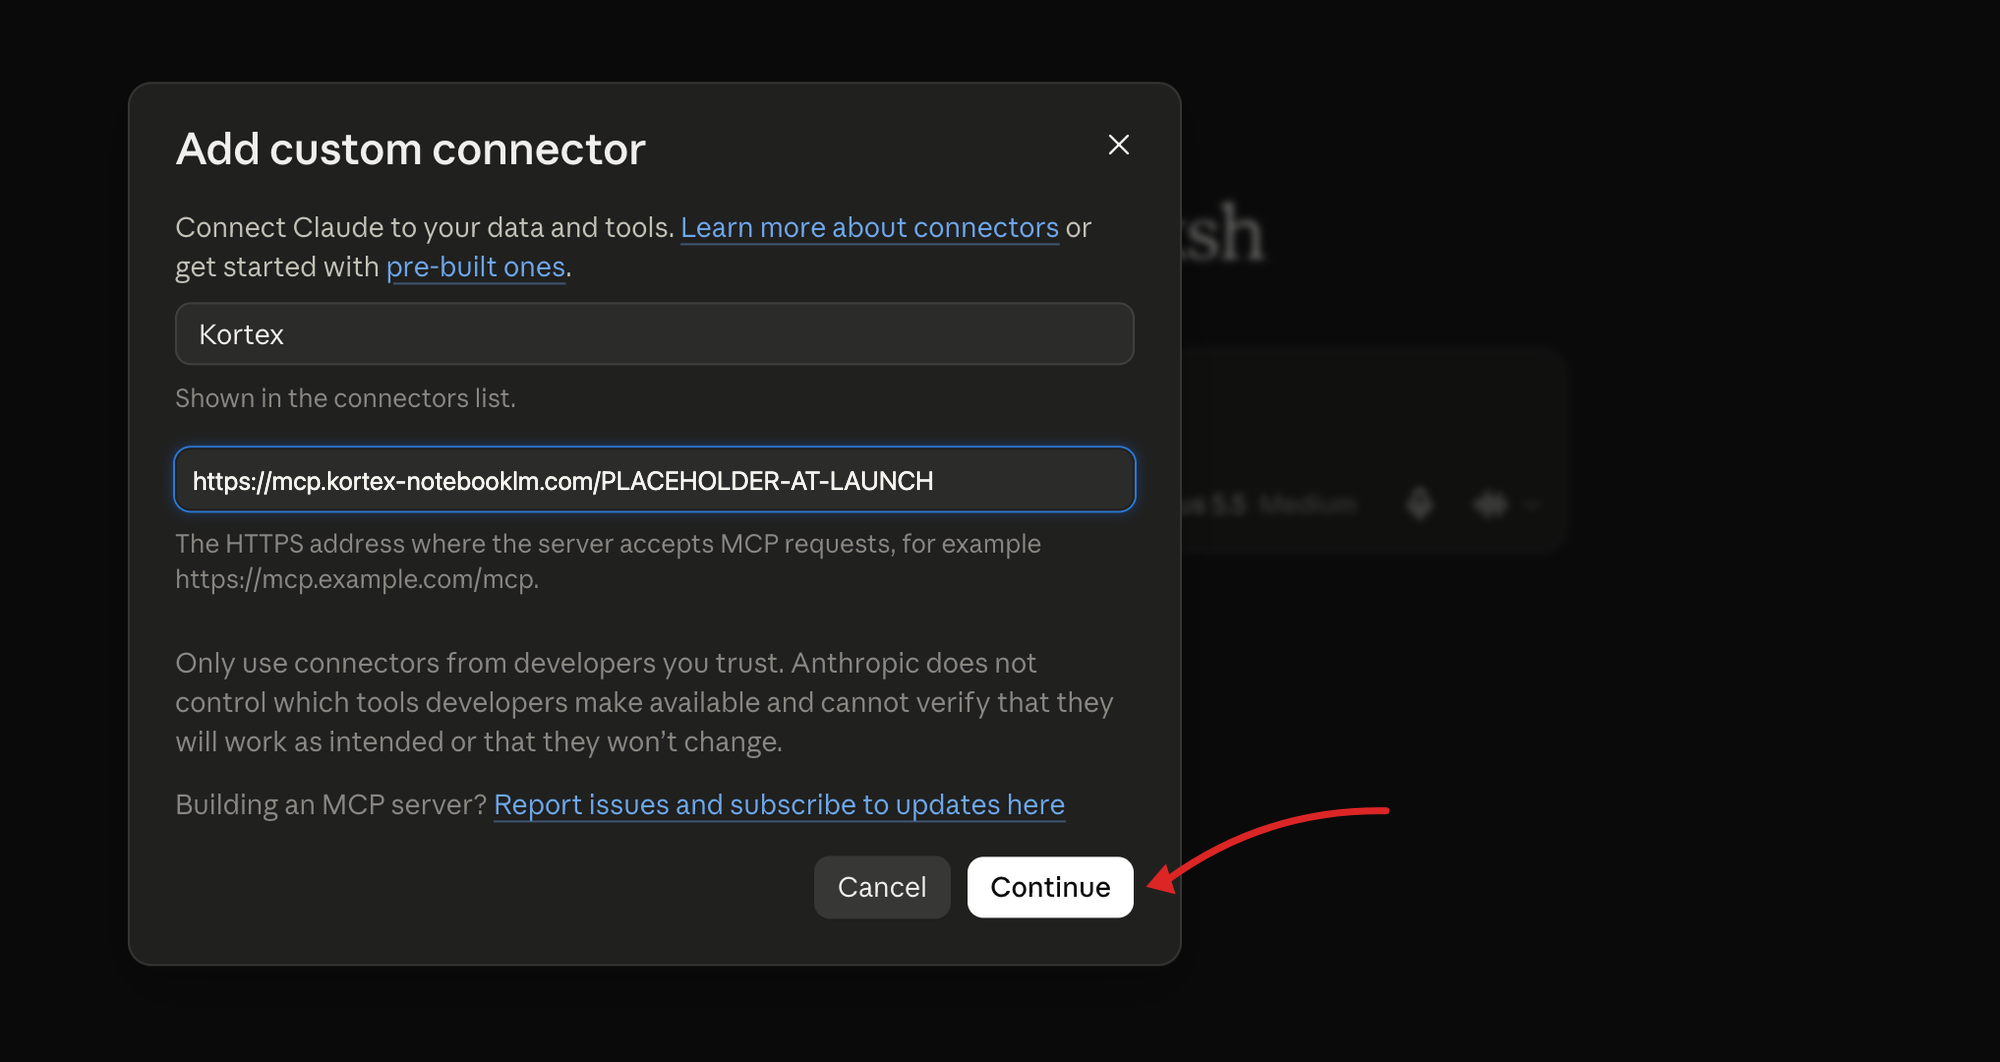
Name it Kortex, paste the endpoint into the URL field, and press Continue. Your browser opens a Kortex consent page; sign in and you are connected.
Switch it on and off
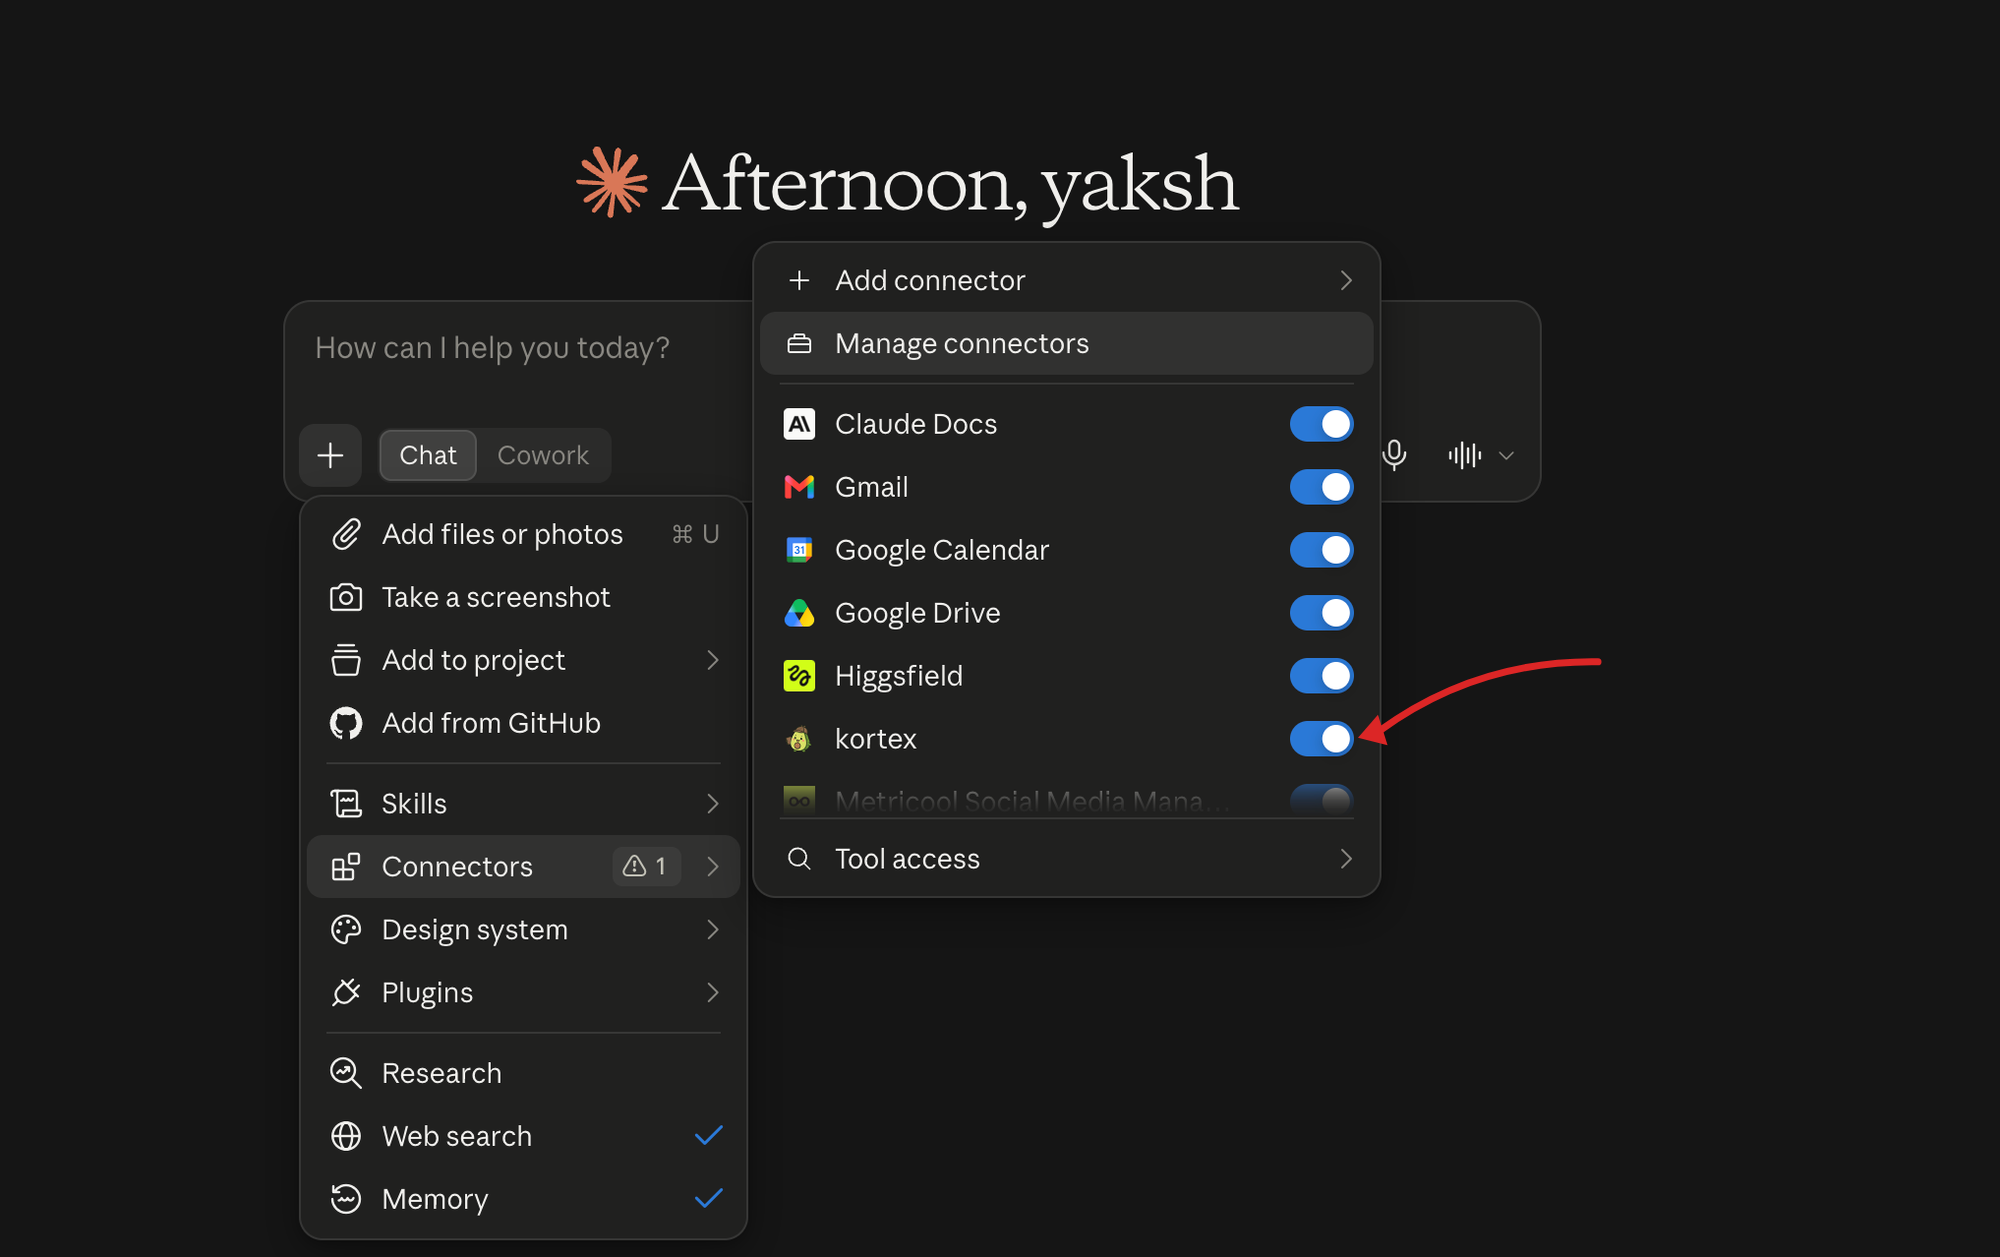
Kortex now sits in that same + → Connectors list with a switch of its own. Leave it on for the chats that should reach your notebooks and off for the ones that should not — with the switch off, that chat cannot call a single tool. Manage connectors opens the full settings page.
Decide what each tool may do
Settings → Connectors → Kortex lists the tools the connector exposes, in groups. Each one can be set to allow, ask every time, or never; the control on a group's header sets all of it at once.
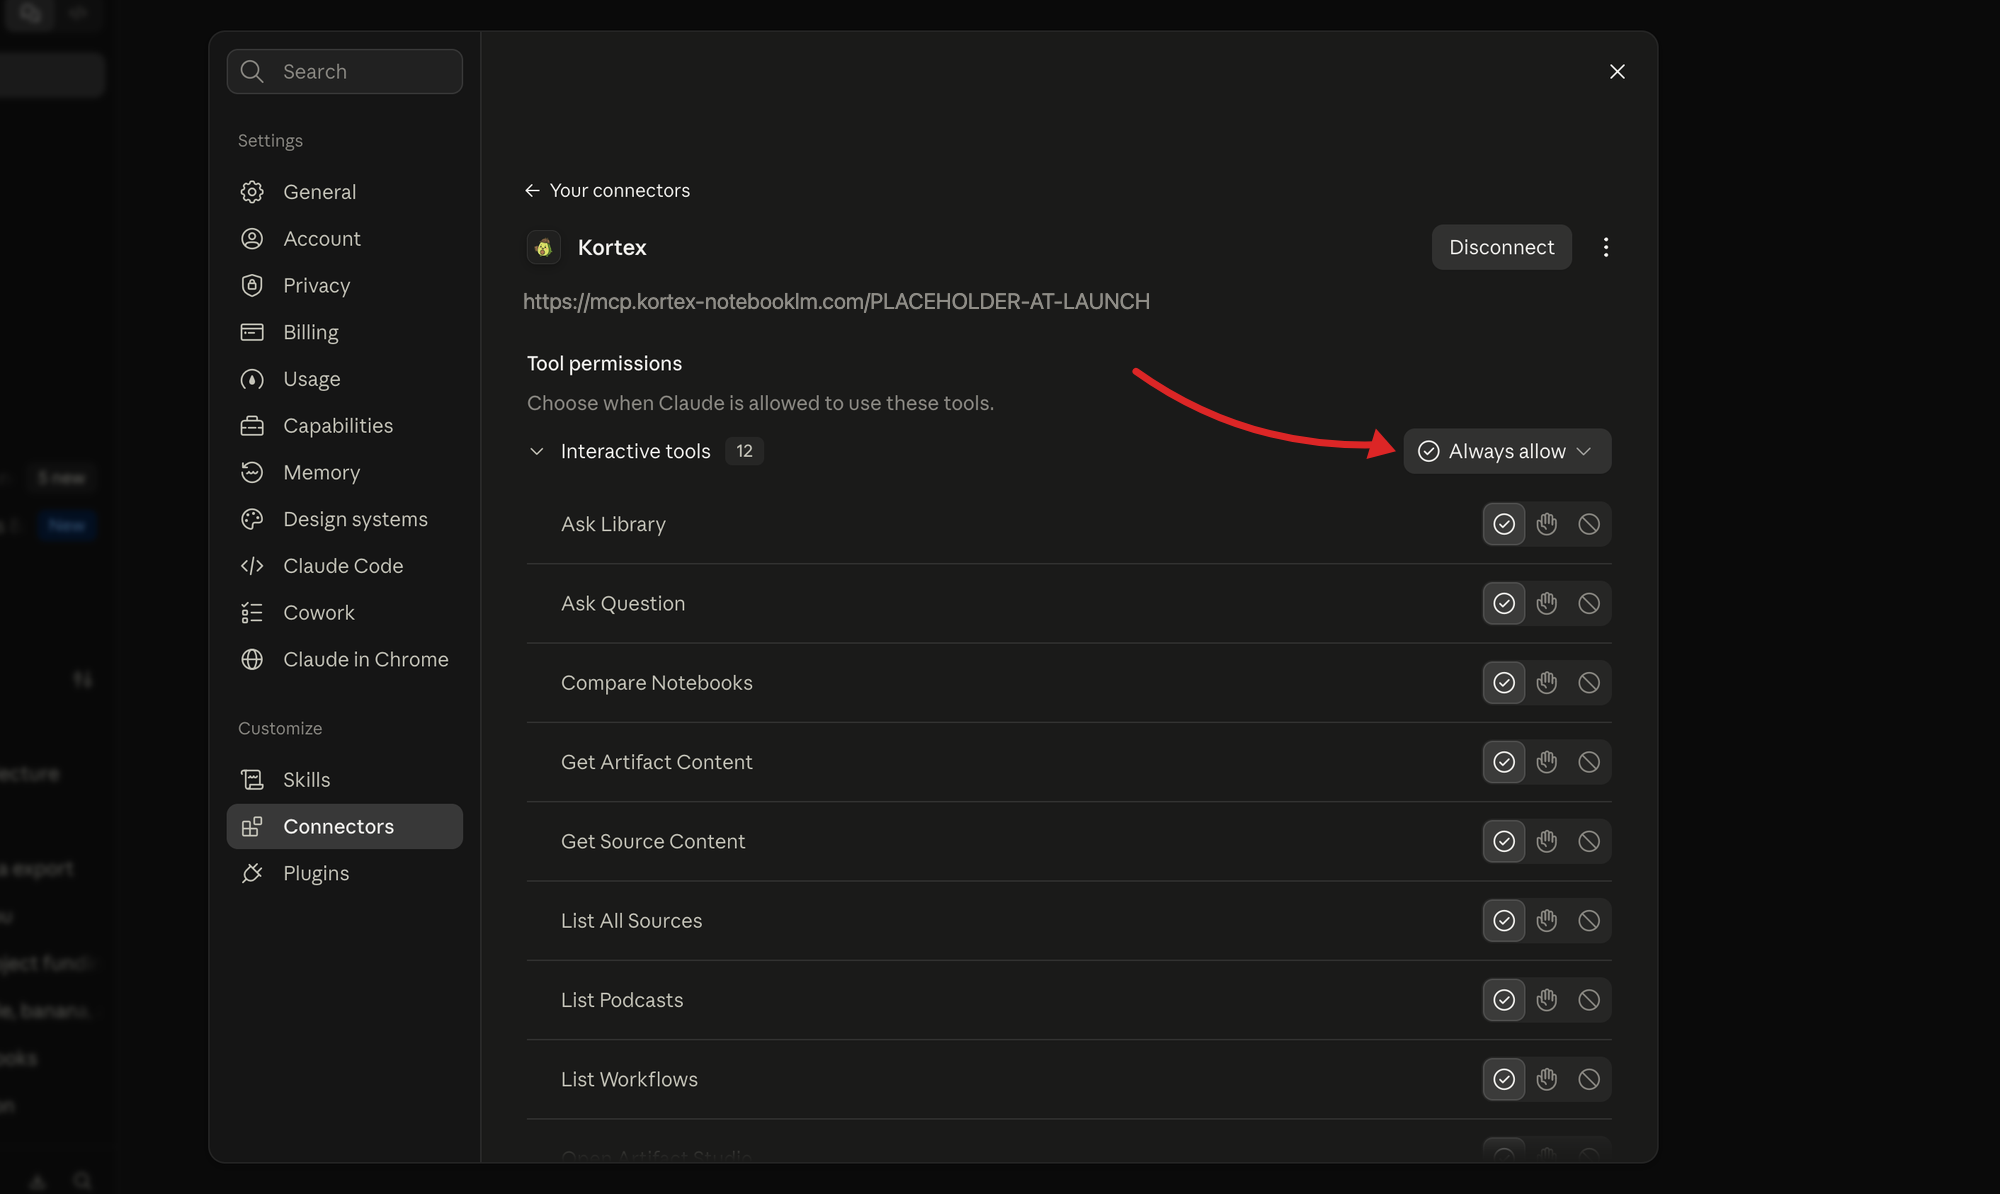
Worth a minute of your time. The tools that only read — ask_question, get_source_content, list_all_sources — are fine left on always allow. Set the ones that delete to ask every time, so nothing leaves your library without a prompt you have to answer. This is Claude's own gate and sits in front of the key profile; the two stack, and the narrower of the pair wins.
With an API key instead
For a machine that cannot open a browser, Claude Desktop reaches the same endpoint through the mcp-remote bridge. Edit your config file:
- macOS —
~/Library/Application Support/Claude/claude_desktop_config.json - Windows —
%APPDATA%\Claude\claude_desktop_config.json
{
  "mcpServers": {
    "kortex": {
      "command": "npx",
      "args": [
        "-y",
        "mcp-remote",
        "https://mcp.kortex-notebooklm.com/PLACEHOLDER-AT-LAUNCH",
        "--header",
        "Authorization: Bearer kx_mcp_your_key_here"
      ]
    }
  }
}
Restart Claude Desktop. Kortex appears under the tools icon in the composer.
ChatGPT reaches MCP servers through developer mode, which is off until you turn it on.
Turn developer mode on
Settings → Security and login → Developer mode. ChatGPT marks it elevated risk because it lets you add connectors OpenAI has not reviewed — which is what a private endpoint like yours is.
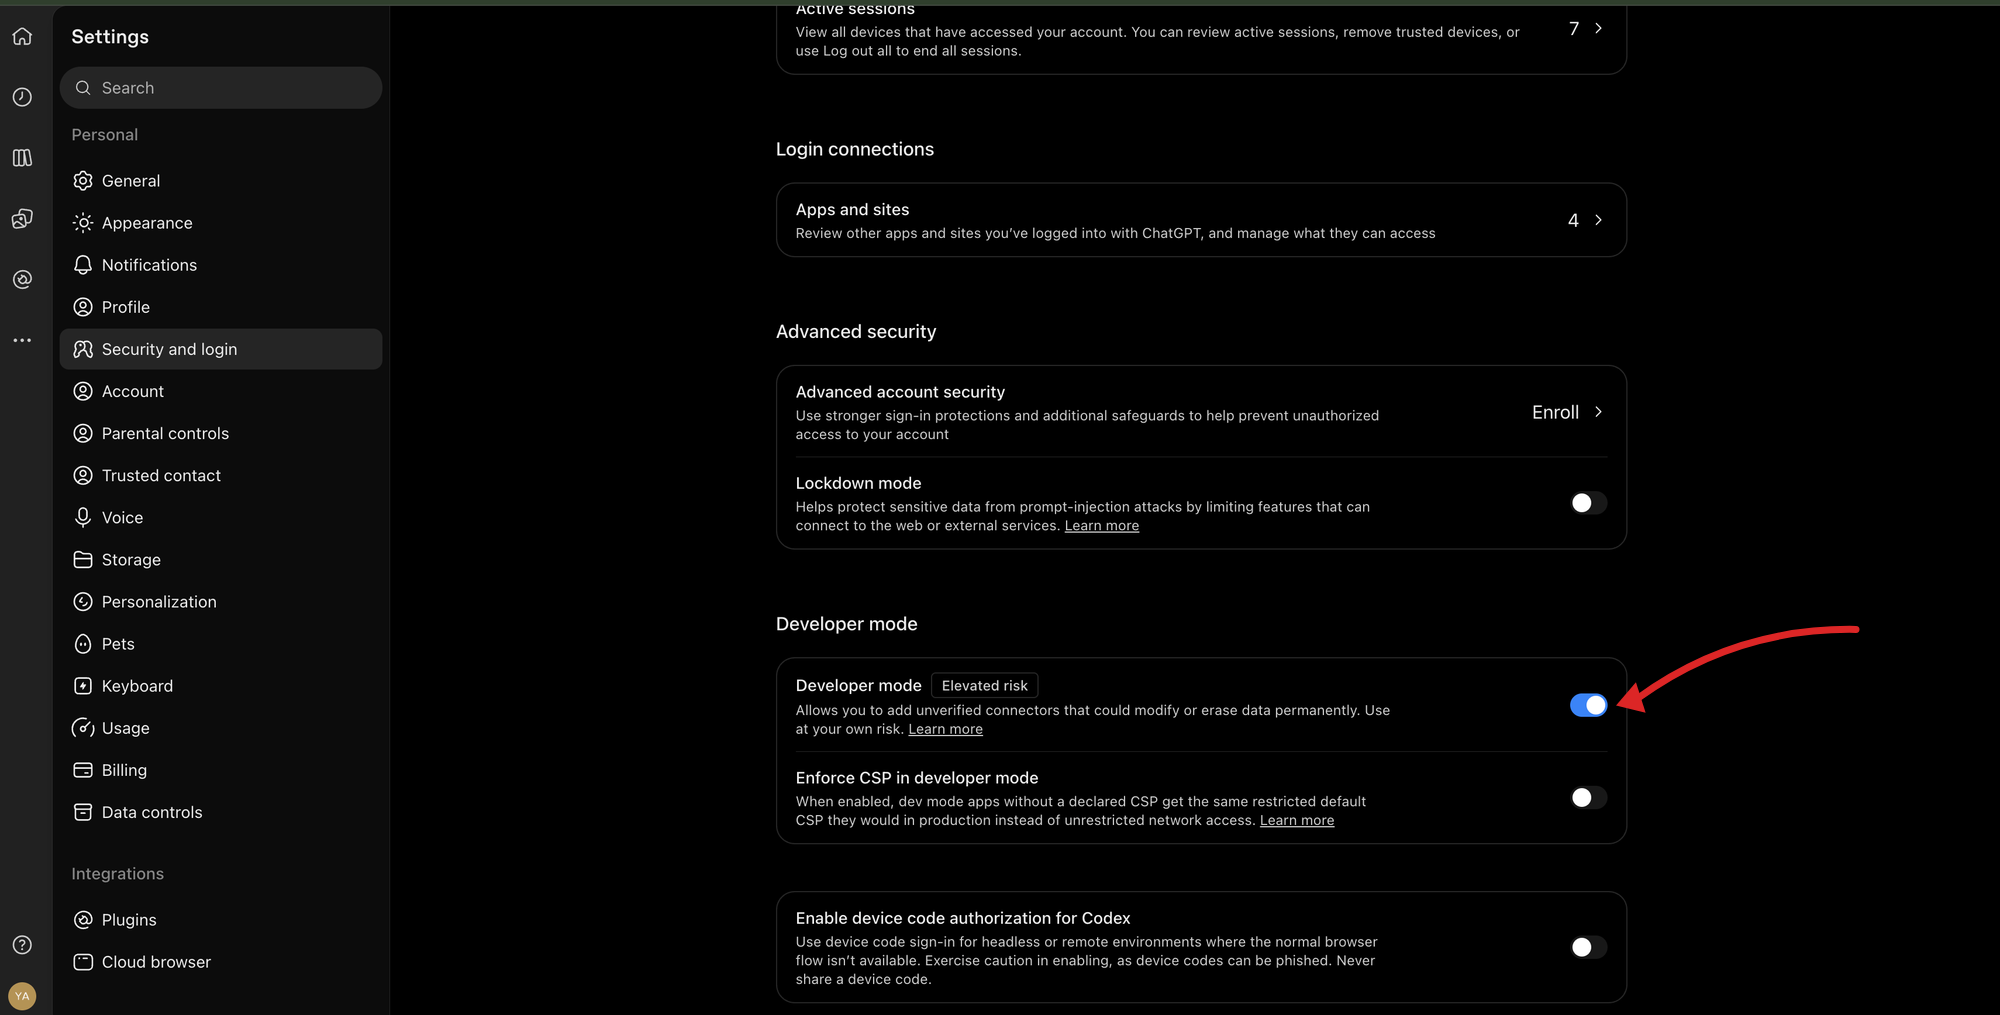
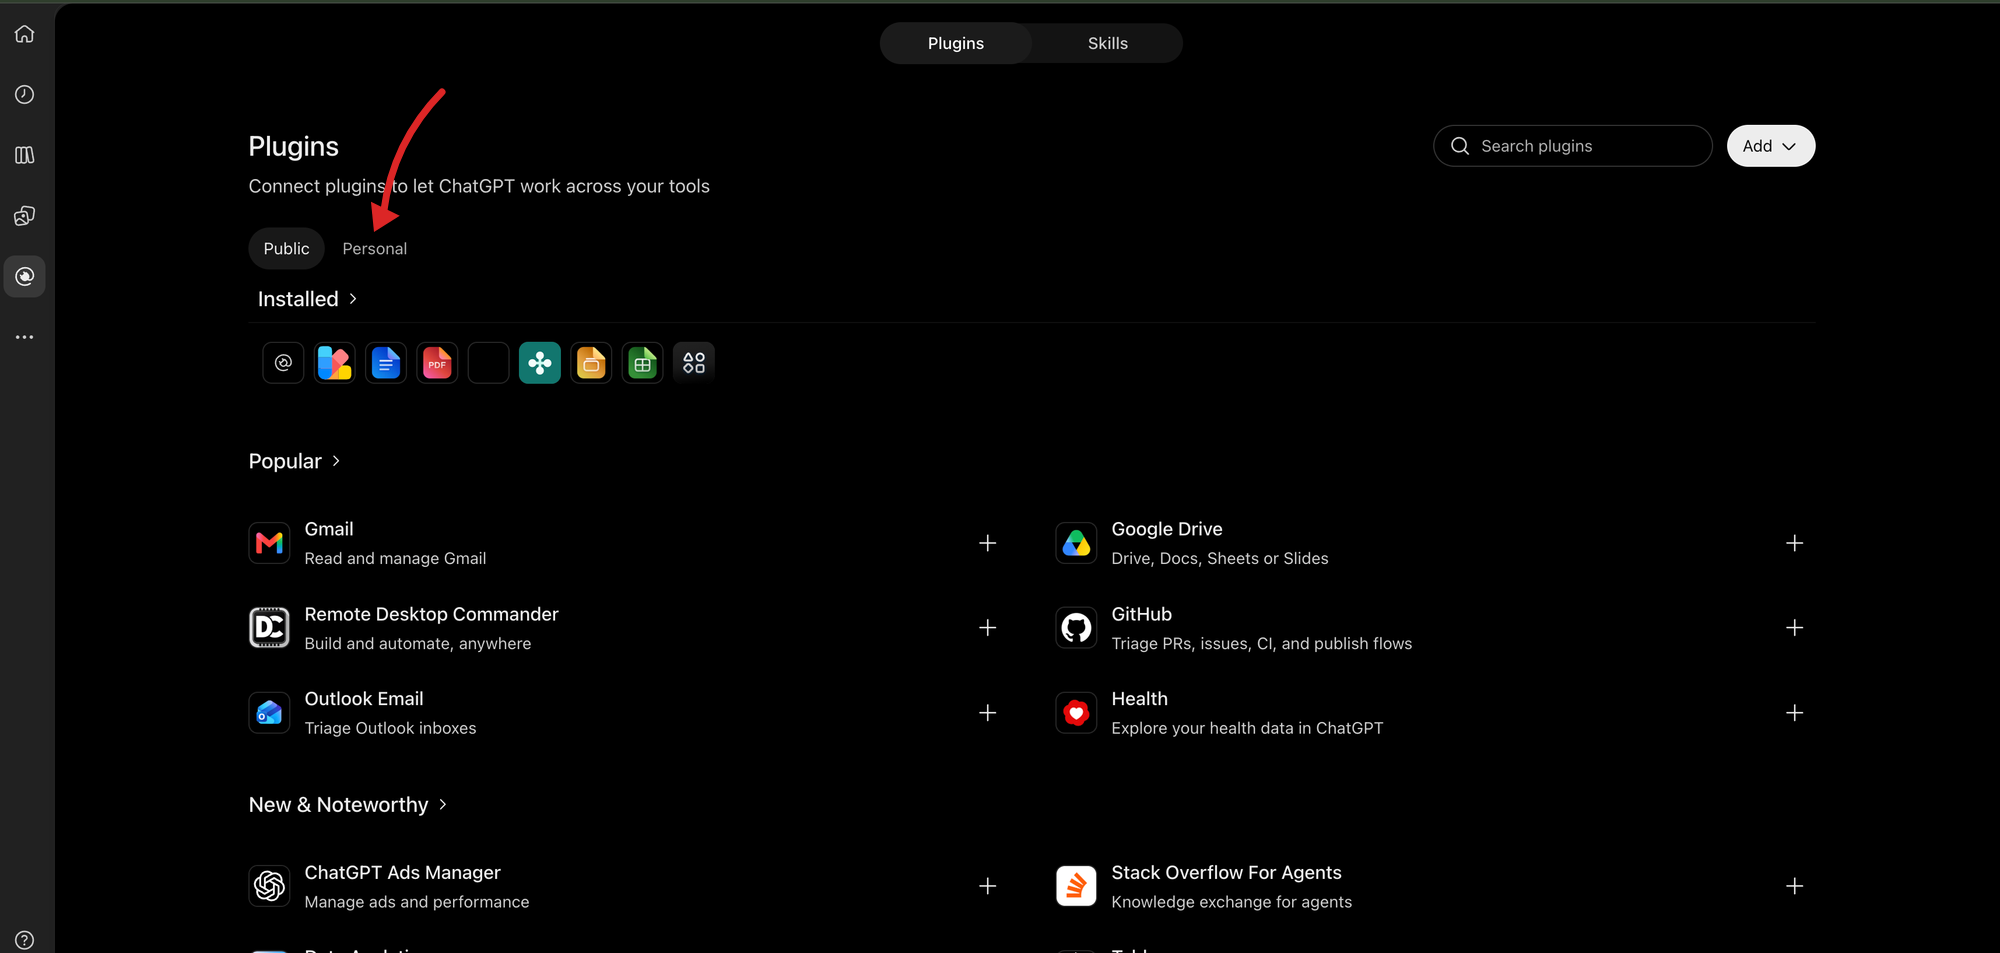
Add Kortex as an MCP app
Open Plugins and switch to the Personal tab. Public is OpenAI's reviewed directory; yours lives under Personal.
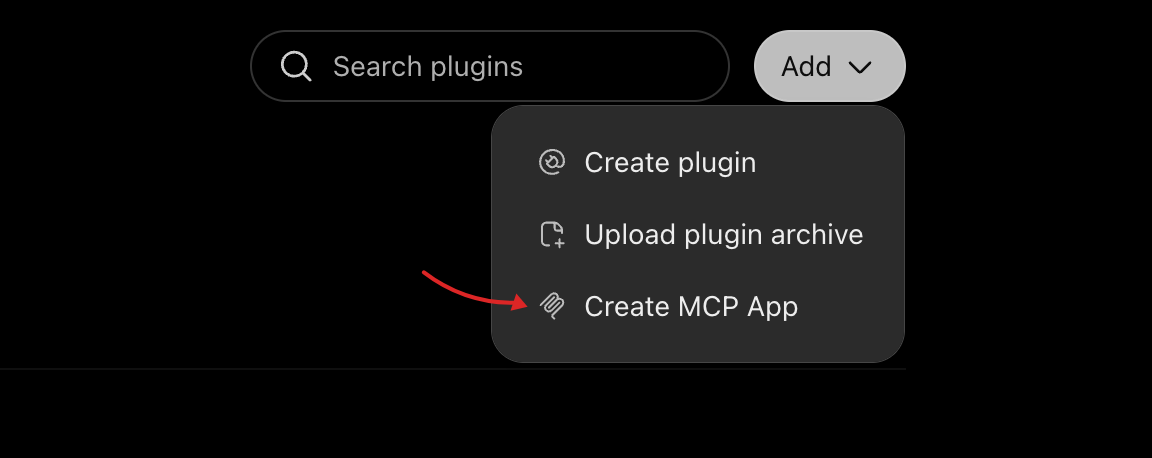
Then Add → Create MCP App.
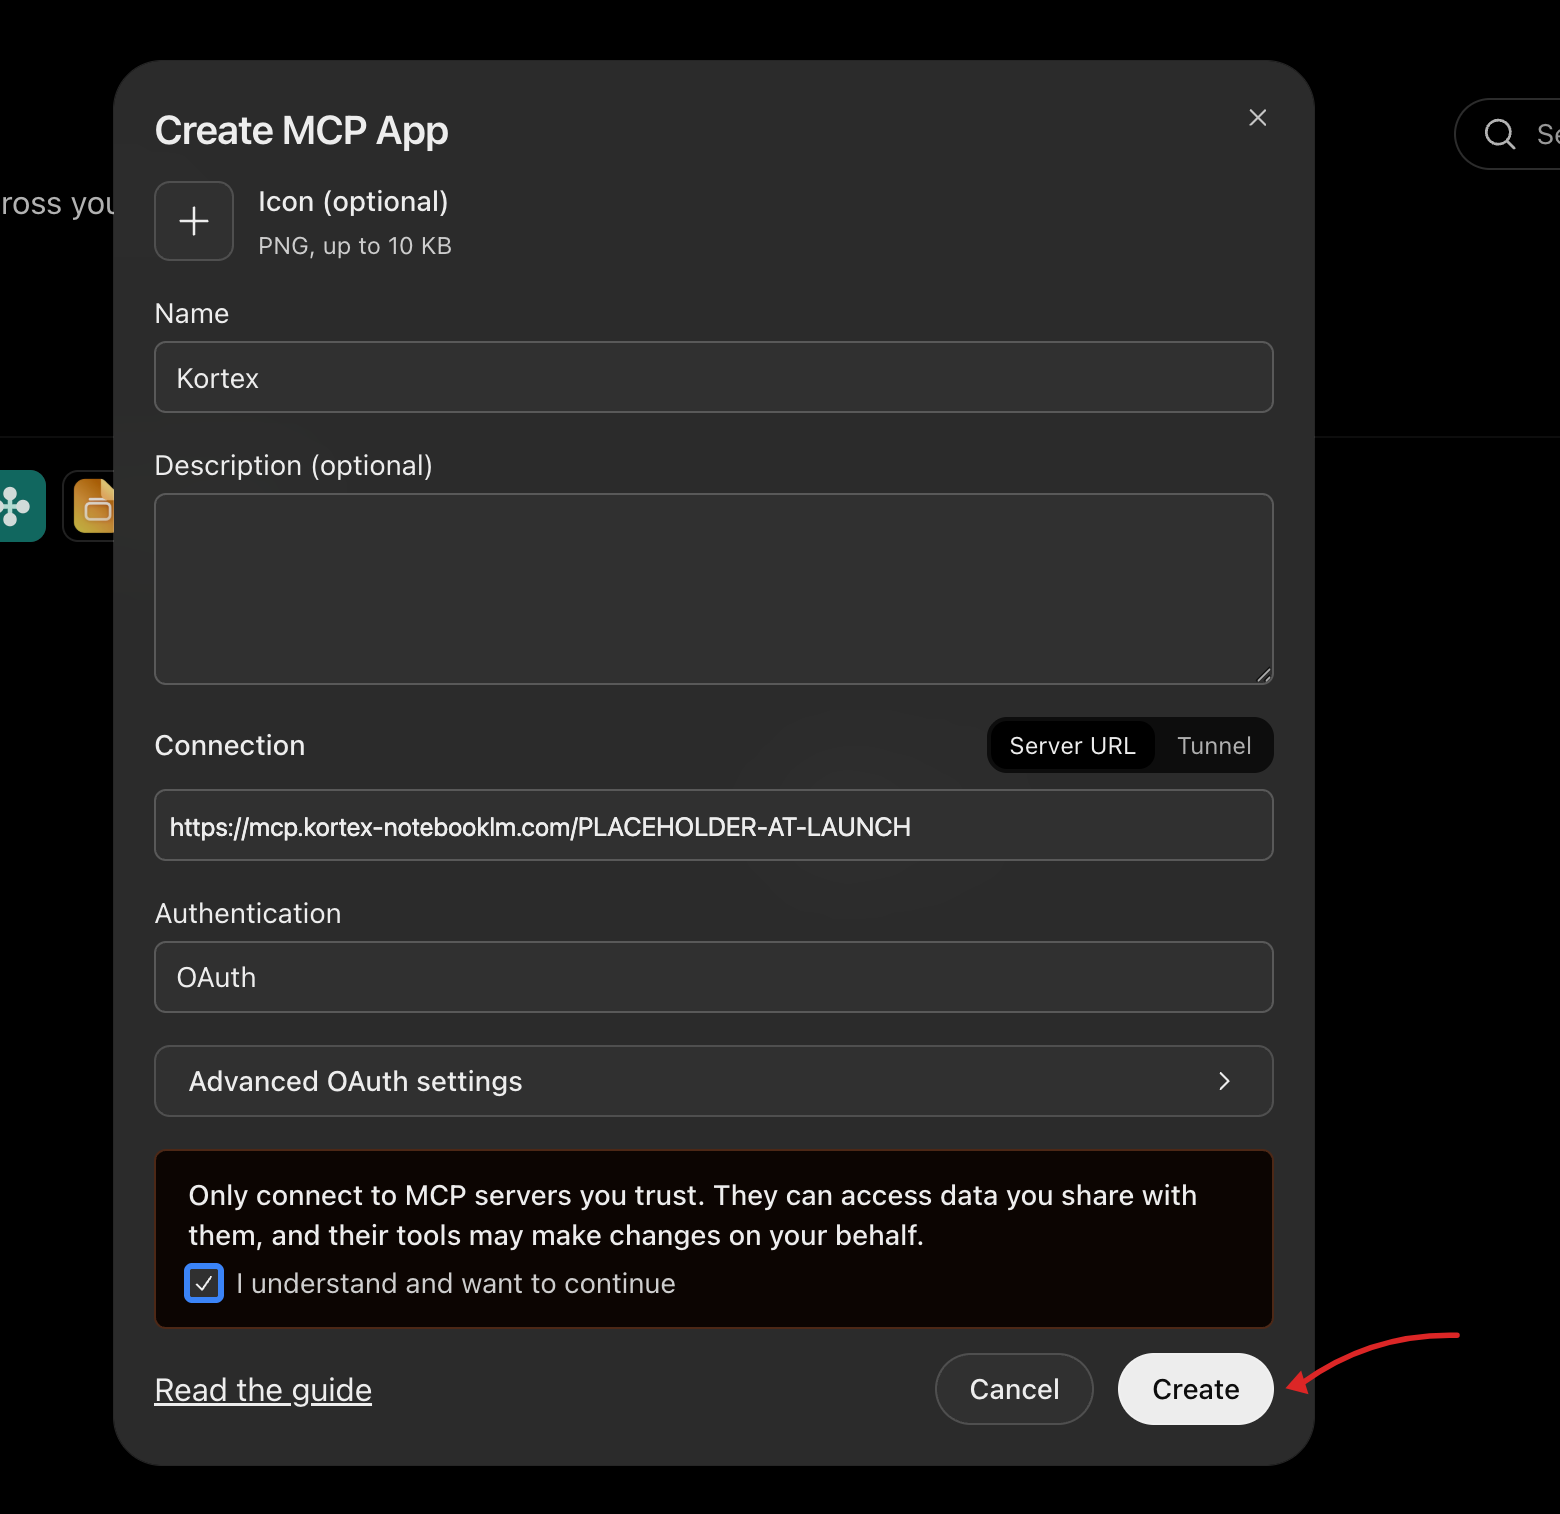
Fill the dialog in: Name Kortex, Connection left on Server URL with the endpoint below, and Authentication set to OAuth. Tick the box acknowledging the warning, then Create — ChatGPT sends you to a Kortex consent page to sign in.
https://mcp.kortex-notebooklm.com/PLACEHOLDER-AT-LAUNCH
Add this to .cursor/mcp.json in your project, or ~/.cursor/mcp.json to enable it everywhere:
{
  "mcpServers": {
    "kortex": {
      "url": "https://mcp.kortex-notebooklm.com/PLACEHOLDER-AT-LAUNCH",
      "headers": {
        "Authorization": "Bearer kx_mcp_your_key_here"
      }
    }
  }
}
Cursor picks the file up immediately; check Settings → MCP for a green indicator.
Add this to .vscode/mcp.json in your workspace. The inputs block means VS Code prompts for the key once and stores it in the OS keychain, instead of you committing it to a file:
{
  "inputs": [
    {
      "type": "promptString",
      "id": "kortex-key",
      "description": "Kortex MCP API key",
      "password": true
    }
  ],
  "servers": {
    "kortex": {
      "type": "http",
      "url": "https://mcp.kortex-notebooklm.com/PLACEHOLDER-AT-LAUNCH",
      "headers": {
        "Authorization": "Bearer ${input:kortex-key}"
      }
    }
  }
}
Open the Command Palette and run MCP: List Servers → kortex → Start Server, then paste the key when prompted.
Antigravity has an MCP Store, but Kortex is not in it — a private endpoint goes into the config file by hand.
- Click … at the top of the editor's agent side panel and choose MCP Servers.
- Click Manage MCP Servers, then View raw config.
- Add Kortex to
mcpServers:
{
  "mcpServers": {
    "kortex": {
      "serverUrl": "https://mcp.kortex-notebooklm.com/PLACEHOLDER-AT-LAUNCH"
    }
  }
}
That is the whole entry. Kortex registers clients dynamically, so Antigravity signs itself up and opens a consent page the first time it connects — no client ID to create, no key to paste.
The file is ~/.gemini/config/mcp_config.json globally, or .agents/mcp_config.json to enable it in one workspace only.
The URL key must be serverUrl. Antigravity dropped url and httpUrl when it split MCP out of the old Gemini CLI settings file, and a config still using either is ignored rather than rejected — the server simply never appears.
With an API key instead
Add a headers object. Same URL; the header is what selects the key path:
{
  "mcpServers": {
    "kortex": {
      "serverUrl": "https://mcp.kortex-notebooklm.com/PLACEHOLDER-AT-LAUNCH",
      "headers": {
        "Authorization": "Bearer kx_mcp_your_key_here"
      }
    }
  }
}
Holding tools back
Antigravity's own disabledTools keeps named tools away from the model — the same job Claude's per-tool permissions do, and worth pointing at the destructive ones:
"disabledTools": ["delete_notebook", "delete_sources", "delete_artifact"]
It sits alongside, not instead of, a narrow key profile — that one is enforced by Kortex, this one by your editor.
Add this to ~/.codeium/windsurf/mcp_config.json:
{
  "mcpServers": {
    "kortex": {
      "serverUrl": "https://mcp.kortex-notebooklm.com/PLACEHOLDER-AT-LAUNCH",
      "headers": {
        "Authorization": "Bearer kx_mcp_your_key_here"
      }
    }
  }
}
Open MCP Servers → Configure MCP Servers in the Cline panel and add:
{
  "mcpServers": {
    "kortex": {
      "url": "https://mcp.kortex-notebooklm.com/PLACEHOLDER-AT-LAUNCH",
      "headers": {
        "Authorization": "Bearer kx_mcp_your_key_here"
      }
    }
  }
}
Add this to ~/.codex/config.toml:
[mcp_servers.kortex]
command = "npx"
args = [
  "-y",
  "mcp-remote",
  "https://mcp.kortex-notebooklm.com/PLACEHOLDER-AT-LAUNCH",
  "--header",
  "Authorization: Bearer kx_mcp_your_key_here"
]
Open settings.json from the command palette and add:
{
  "context_servers": {
    "kortex": {
      "command": {
        "path": "npx",
        "args": [
          "-y",
          "mcp-remote",
          "https://mcp.kortex-notebooklm.com/PLACEHOLDER-AT-LAUNCH",
          "--header",
          "Authorization: Bearer kx_mcp_your_key_here"
        ]
      }
    }
  }
}
Any other MCP client
If your client supports remote MCP servers, give it these two values:
| Setting | Value |
|---|---|
| Transport | HTTP (Streamable HTTP) |
| URL | https://mcp.kortex-notebooklm.com/PLACEHOLDER-AT-LAUNCH |
| Header | Authorization: Bearer kx_mcp_your_key_here |
If it only supports local commands, wrap the endpoint with npx -y mcp-remote <url> --header "Authorization: Bearer …", as in the Claude Desktop tab above.
Choosing an account
If you use Kortex with more than one Google account, call list_accounts and pass the returned email as the account argument on any tool. Leaving it out uses your default account, and no tool call ever changes the account selected in the dashboard.