# Connect Your AI Client
:::note
**Kortex MCP is in private beta.** The connection details on this page are placeholders — the real endpoint is handed out when your beta invite arrives. Everything else here is accurate, so you can read ahead and turn up ready. [Join the beta waitlist →](https://forms.gle/1KeSLTxQHdSwpjPV9)
:::
Copy-paste configuration for every major MCP client. Every one of them can connect by signing in, which needs nothing but a URL.
:::note
The snippets that carry `kx_mcp_your_key_here` are the API-key path, for clients or setups that cannot open a browser. [Create your API key](/docs/mcp-api-key) first, then replace that placeholder with it.
:::
## Pick your client
One command. Your browser opens a Kortex consent page; sign in and you are connected.
```bash
claude mcp add --transport http kortex https://mcp.kortex-notebooklm.com/PLACEHOLDER-AT-LAUNCH
```
With an [API key](/docs/mcp-api-key) instead — for CI, or a machine with no browser. Same URL; the header is what selects the key path:
```bash
claude mcp add --transport http kortex \
https://mcp.kortex-notebooklm.com/PLACEHOLDER-AT-LAUNCH \
--header "Authorization: Bearer kx_mcp_your_key_here"
```
Both take Kortex as a **custom connector**: one URL and a sign-in, with no key to paste and no Node.js to install. The screens are the same in the desktop app and on the web.
#### Add the connector
In the composer, open **+ → Connectors → Add connector → Add custom connector**.
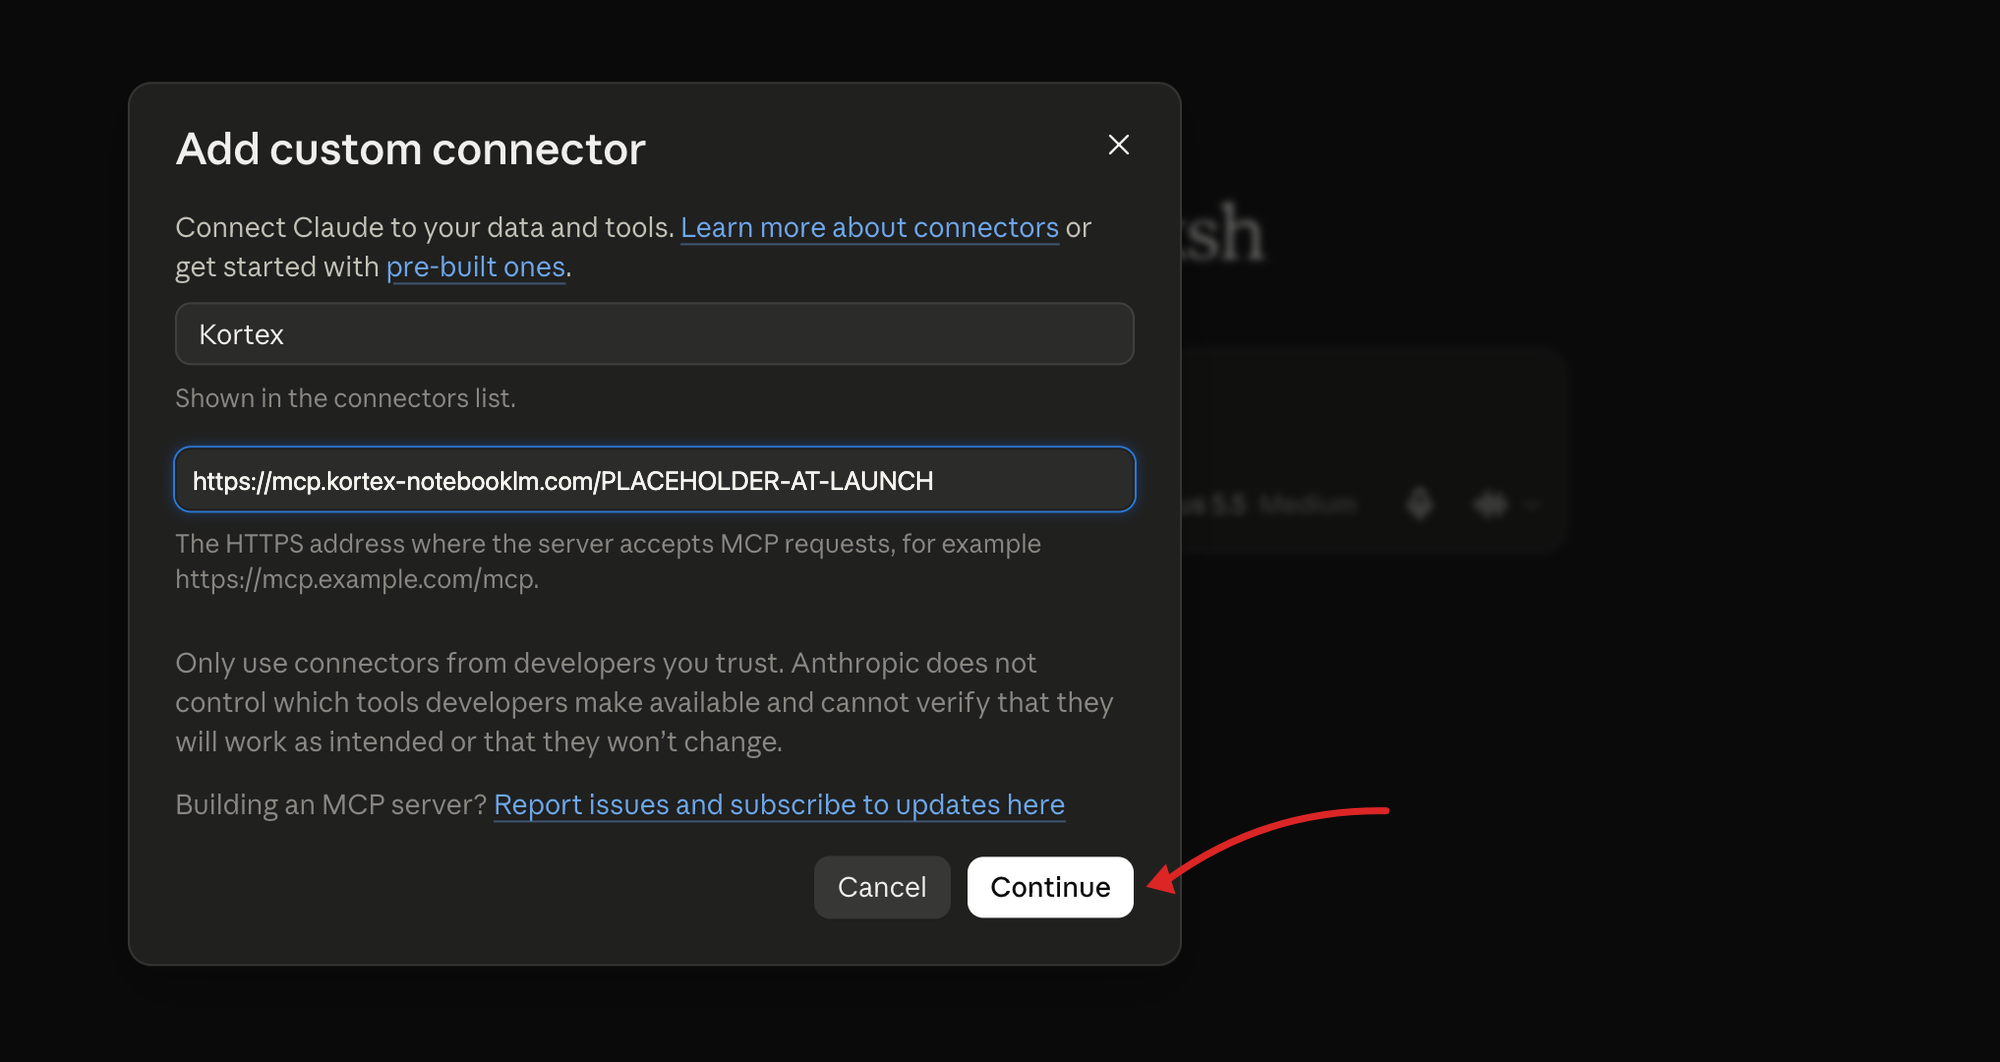
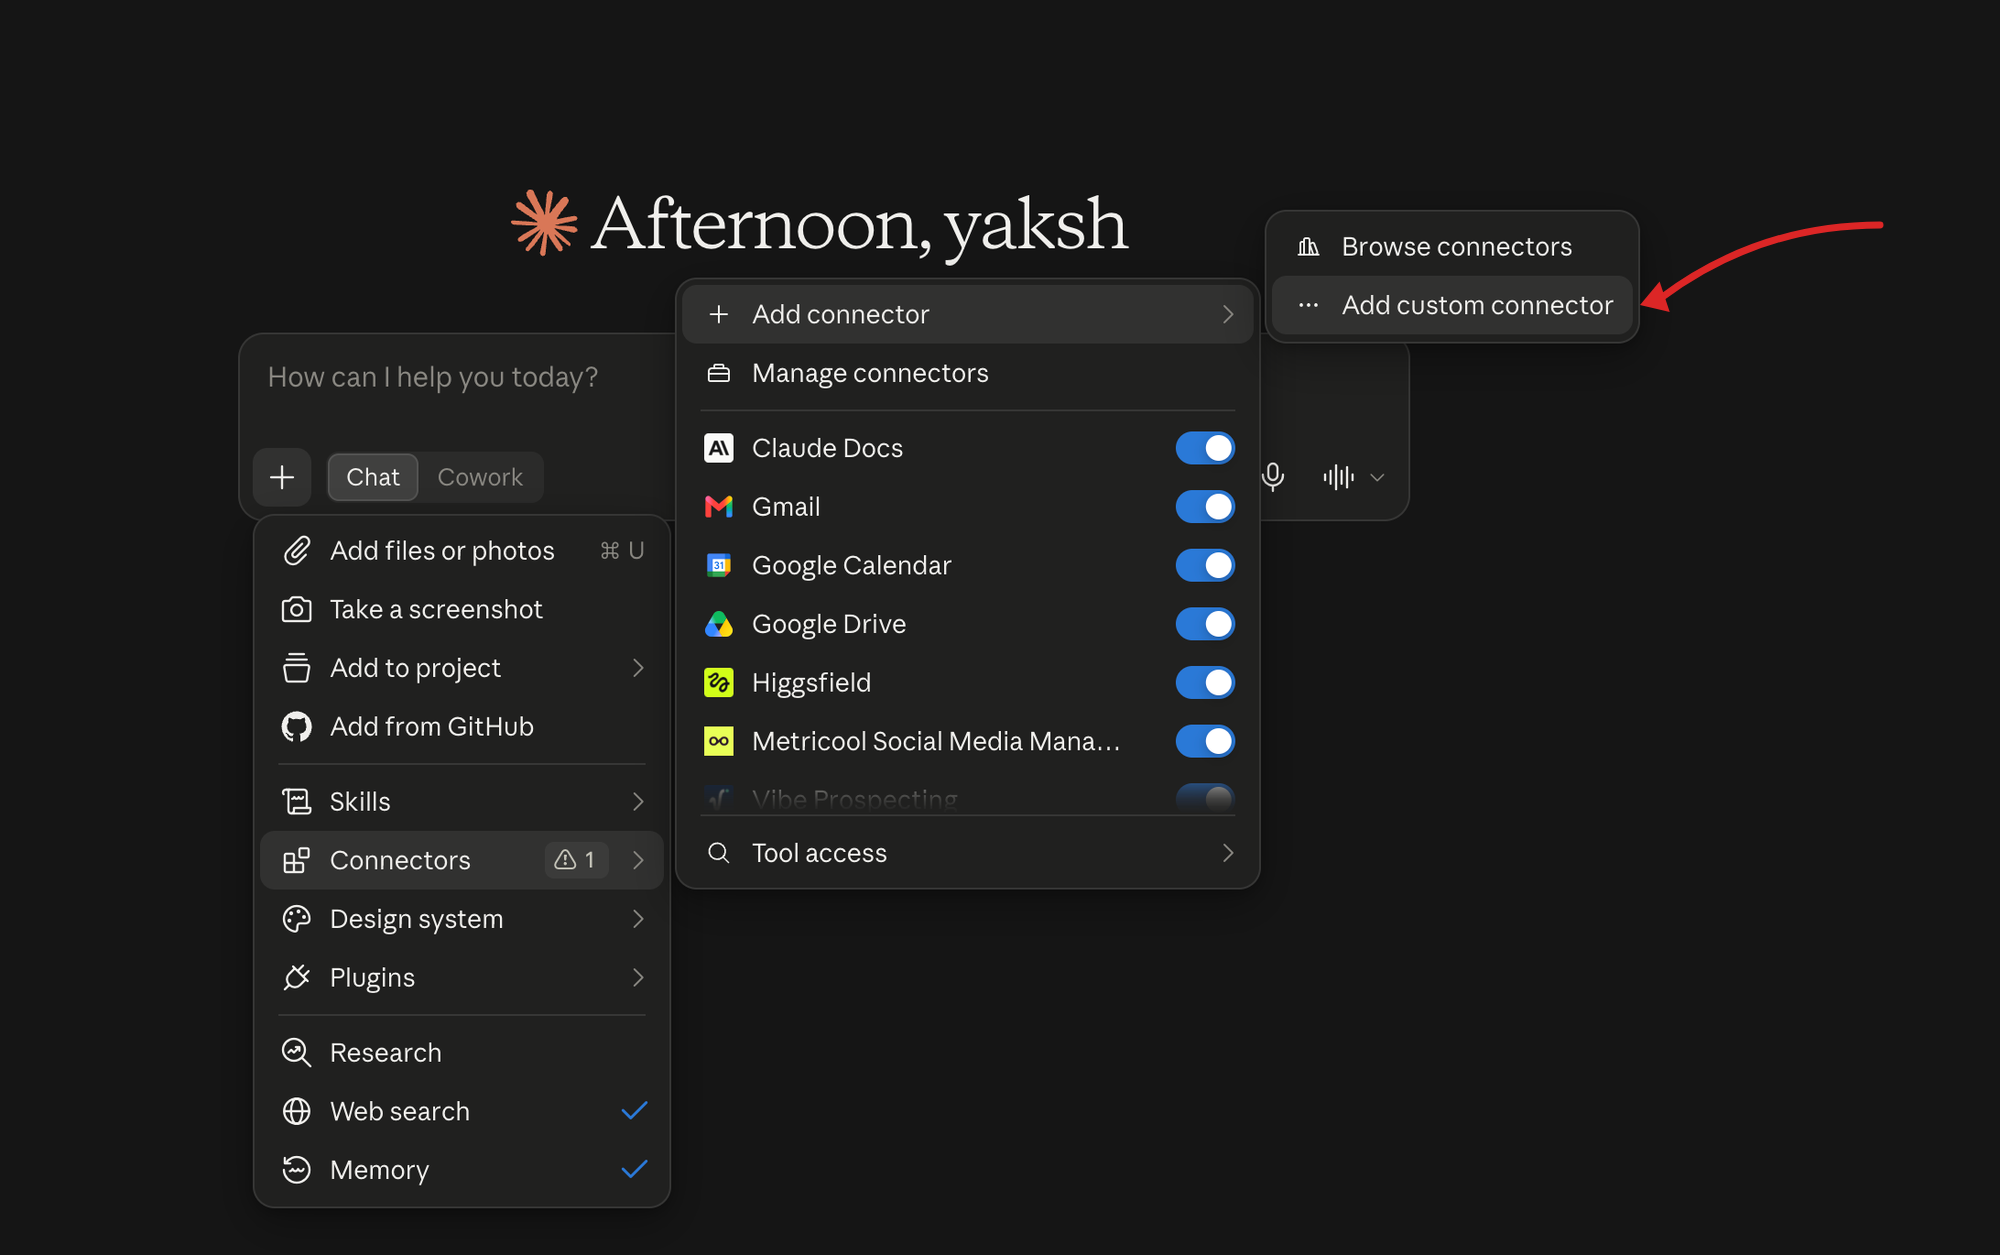 Name it `Kortex`, paste the endpoint into the URL field, and press **Continue**. Your browser opens a Kortex consent page; sign in and you are connected.
 #### Switch it on and off
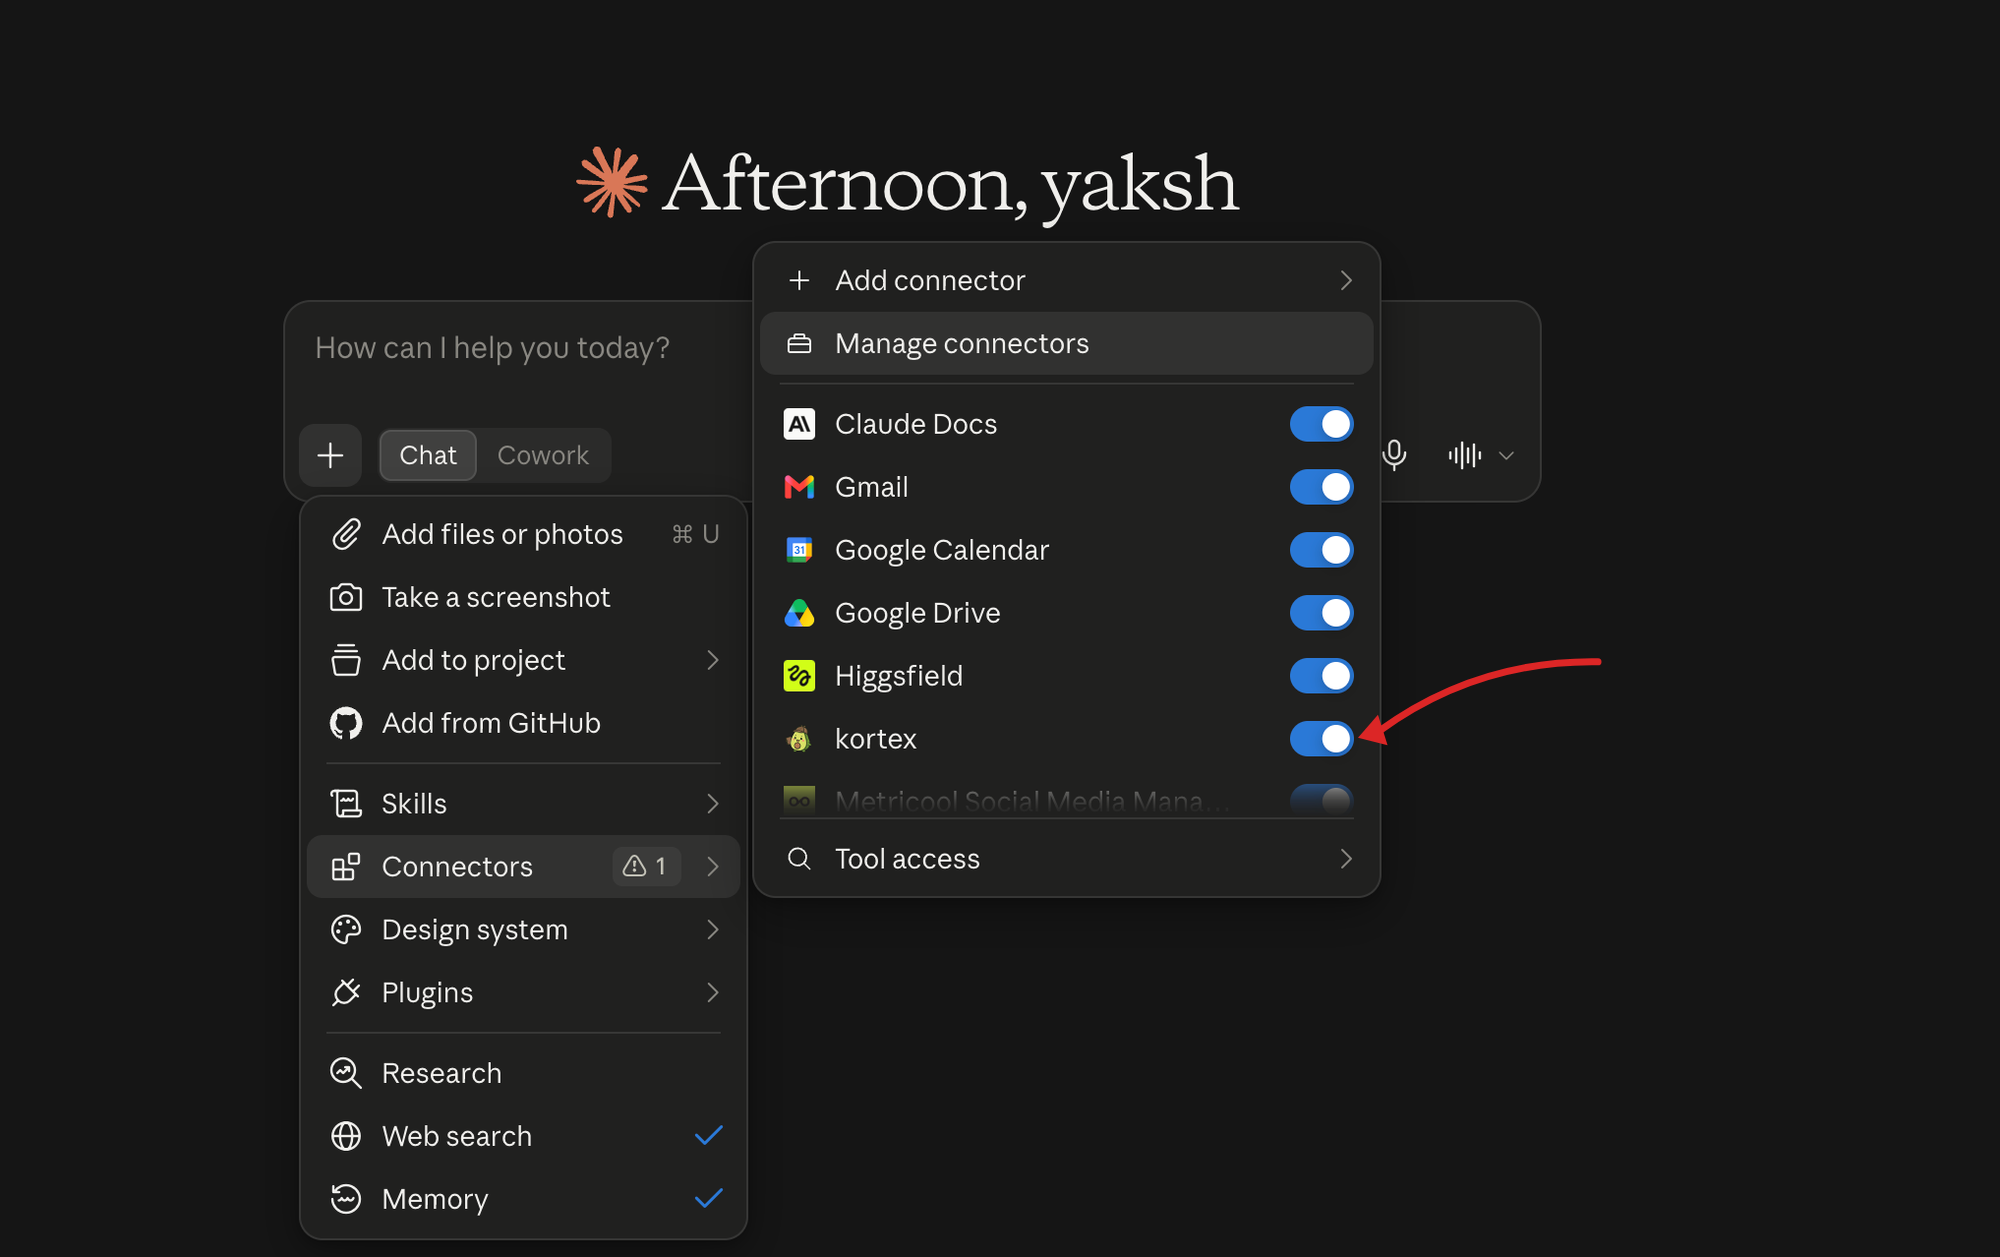
Kortex now sits in that same **+ → Connectors** list with a switch of its own. Leave it on for the chats that should reach your notebooks and off for the ones that should not — with the switch off, that chat cannot call a single tool. **Manage connectors** opens the full settings page.
#### Switch it on and off
Kortex now sits in that same **+ → Connectors** list with a switch of its own. Leave it on for the chats that should reach your notebooks and off for the ones that should not — with the switch off, that chat cannot call a single tool. **Manage connectors** opens the full settings page.
 #### Decide what each tool may do
**Settings → Connectors → Kortex** lists the tools the connector exposes, in groups. Each one can be set to allow, ask every time, or never; the control on a group's header sets all of it at once.
#### Decide what each tool may do
**Settings → Connectors → Kortex** lists the tools the connector exposes, in groups. Each one can be set to allow, ask every time, or never; the control on a group's header sets all of it at once.
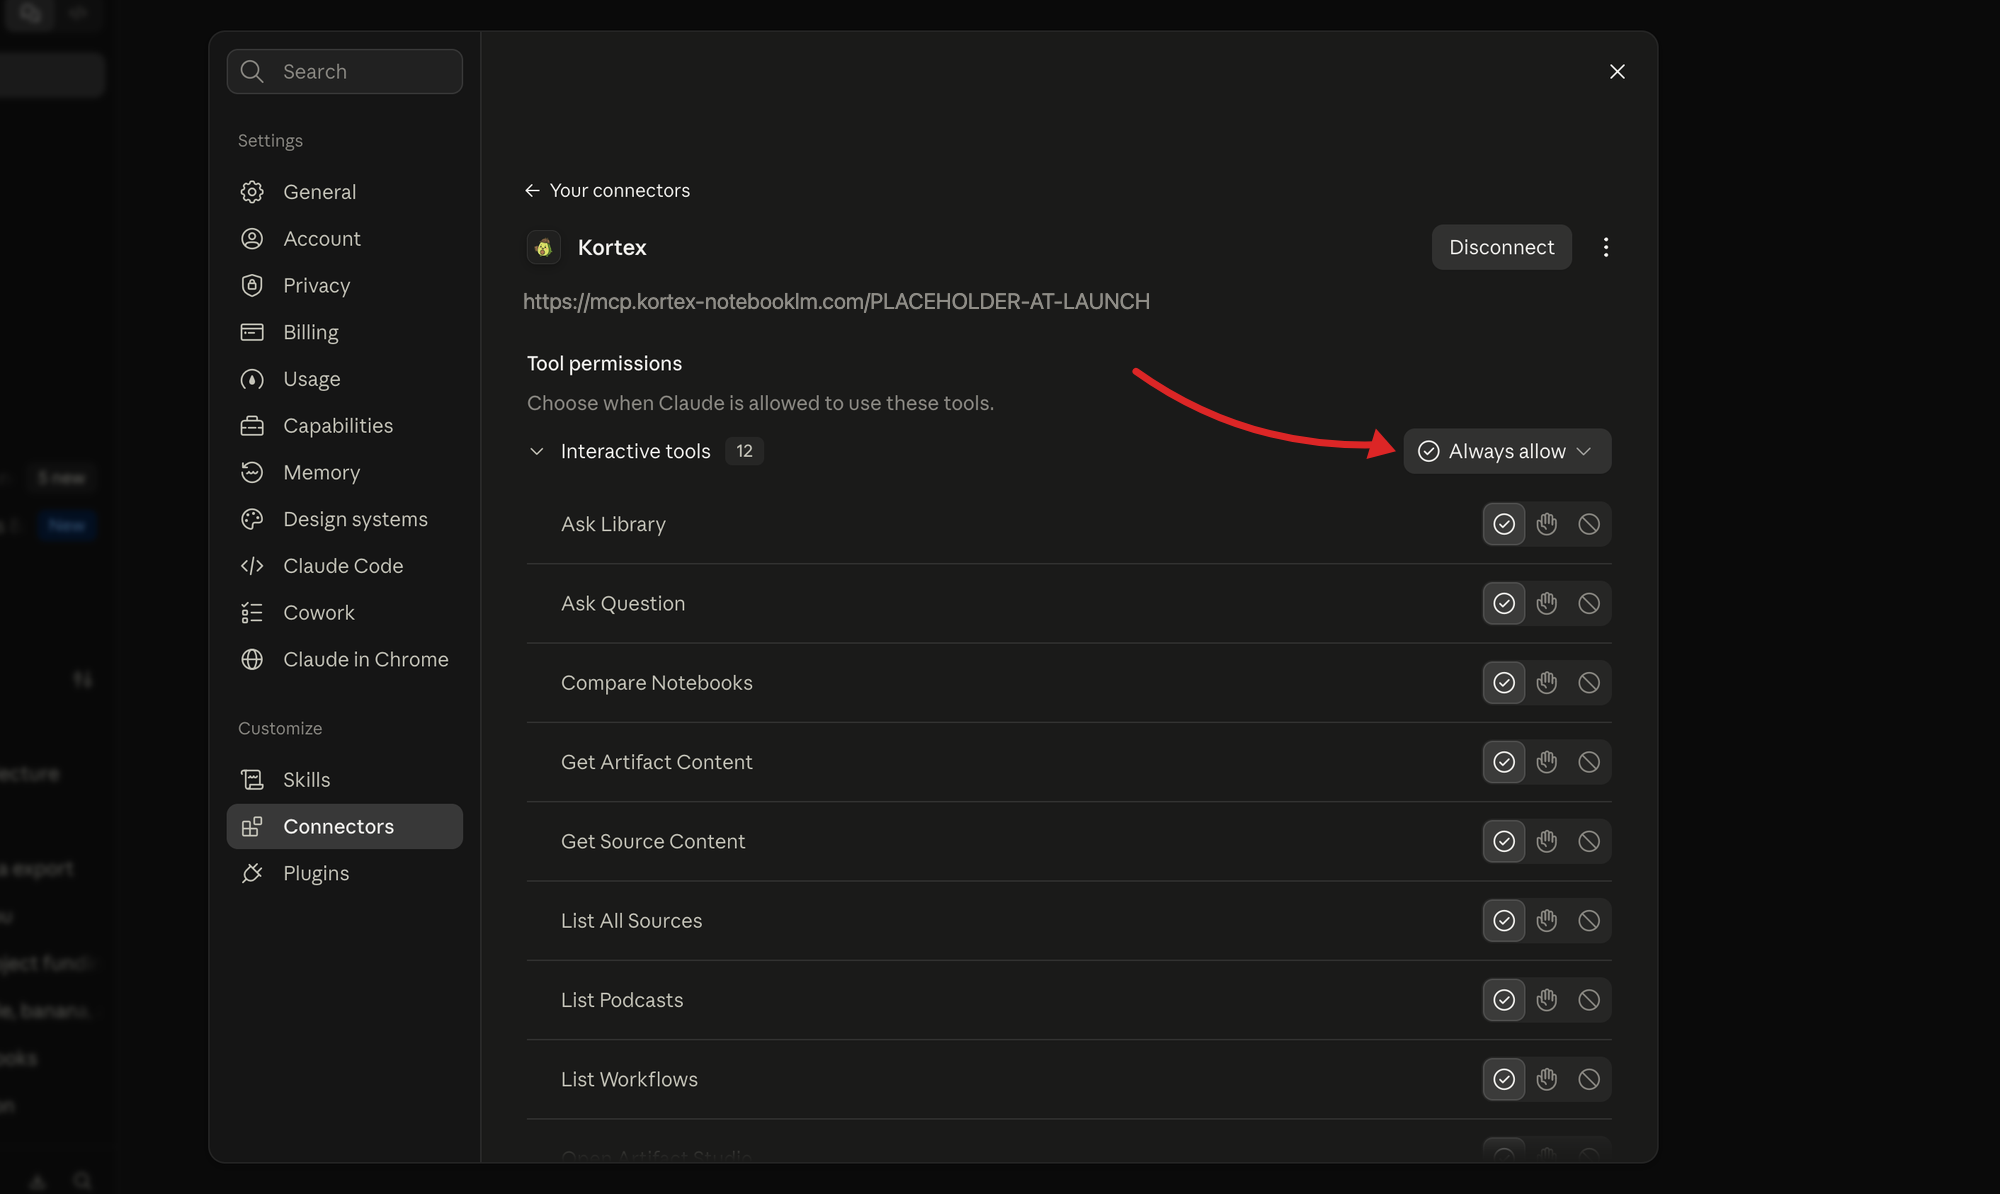 Worth a minute of your time. The tools that only read — `ask_question`, `get_source_content`, `list_all_sources` — are fine left on _always allow_. Set the ones that delete to _ask every time_, so nothing leaves your library without a prompt you have to answer. This is Claude's own gate and sits in front of the [key profile](/docs/mcp-api-key); the two stack, and the narrower of the pair wins.
#### With an API key instead
For a machine that cannot open a browser, Claude Desktop reaches the same endpoint through the `mcp-remote` bridge. Edit your config file:
- **macOS** — `~/Library/Application Support/Claude/claude_desktop_config.json`
- **Windows** — `%APPDATA%\Claude\claude_desktop_config.json`
```json
{
"mcpServers": {
"kortex": {
"command": "npx",
"args": [
"-y",
"mcp-remote",
"https://mcp.kortex-notebooklm.com/PLACEHOLDER-AT-LAUNCH",
"--header",
"Authorization: Bearer kx_mcp_your_key_here"
]
}
}
}
```
Restart Claude Desktop. Kortex appears under the tools icon in the composer.
ChatGPT reaches MCP servers through **developer mode**, which is off until you turn it on.
#### Turn developer mode on
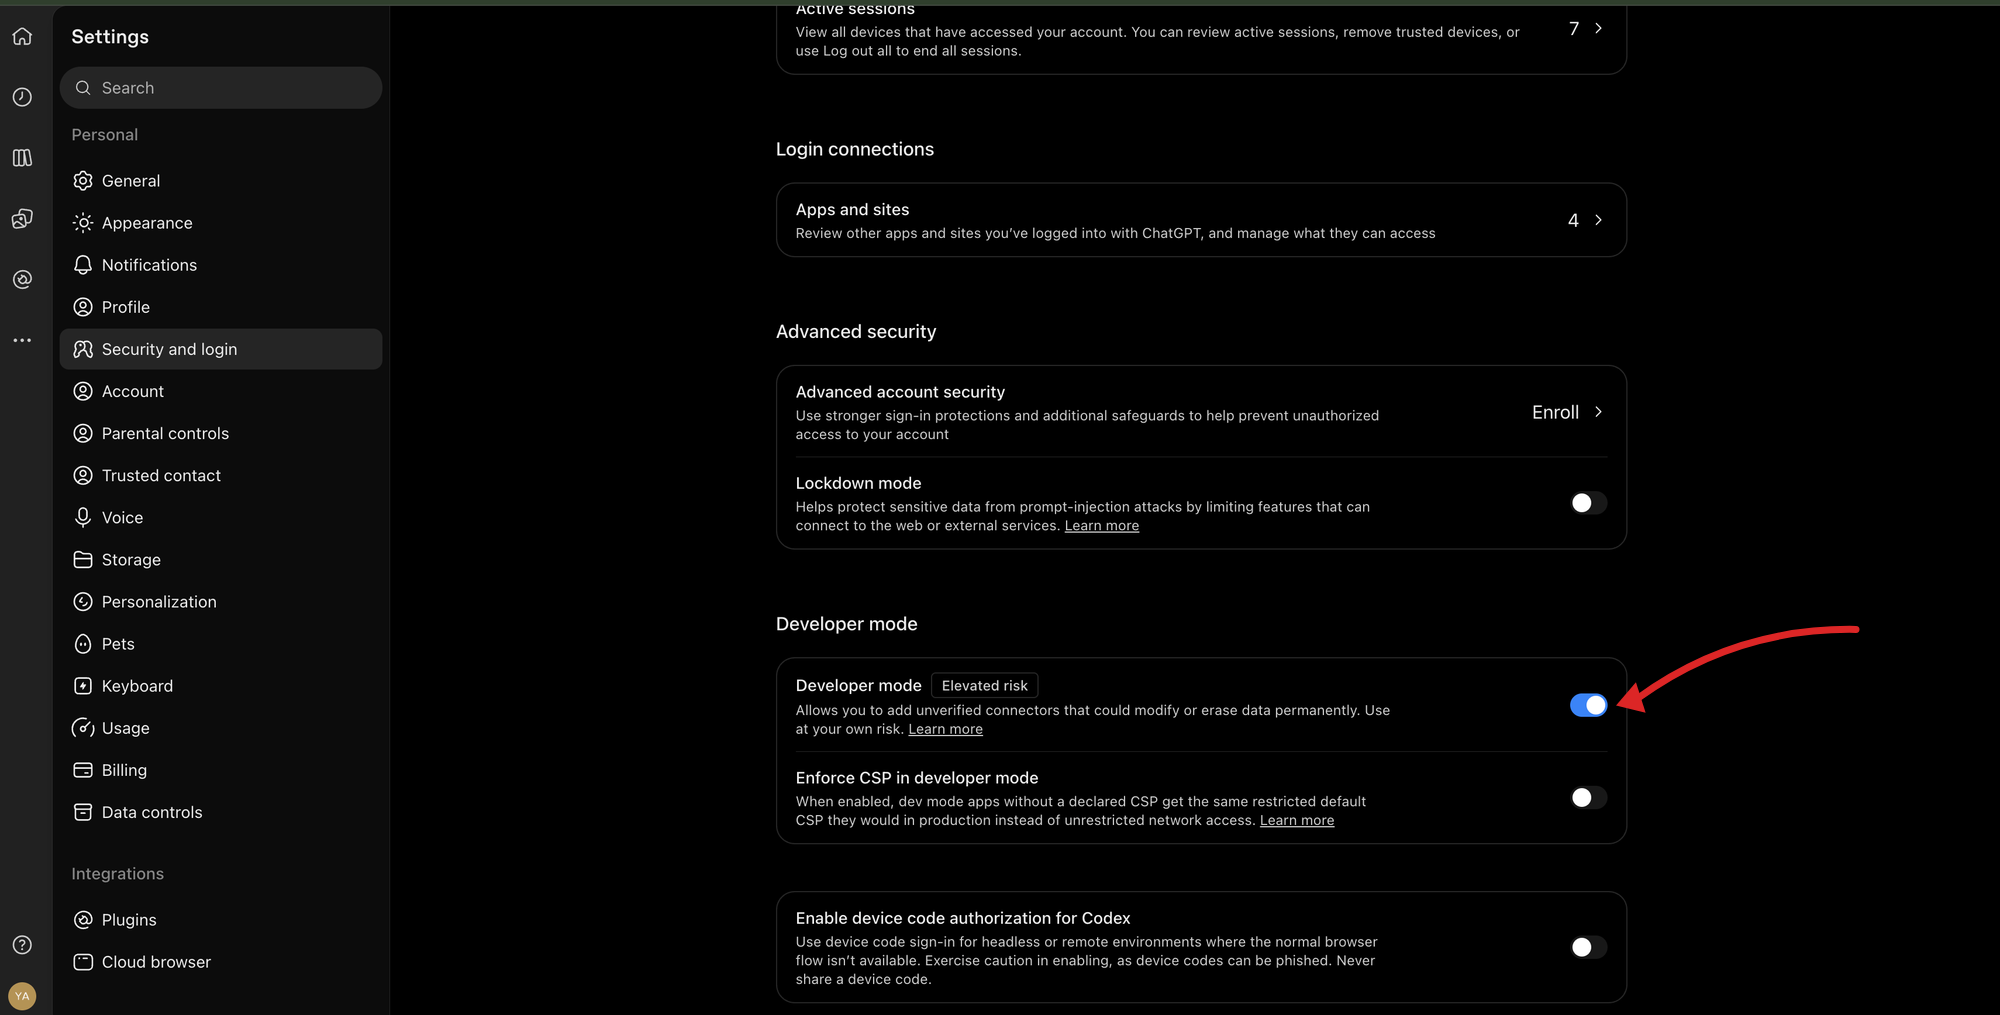
**Settings → Security and login → Developer mode**. ChatGPT marks it _elevated risk_ because it lets you add connectors OpenAI has not reviewed — which is what a private endpoint like yours is.
Worth a minute of your time. The tools that only read — `ask_question`, `get_source_content`, `list_all_sources` — are fine left on _always allow_. Set the ones that delete to _ask every time_, so nothing leaves your library without a prompt you have to answer. This is Claude's own gate and sits in front of the [key profile](/docs/mcp-api-key); the two stack, and the narrower of the pair wins.
#### With an API key instead
For a machine that cannot open a browser, Claude Desktop reaches the same endpoint through the `mcp-remote` bridge. Edit your config file:
- **macOS** — `~/Library/Application Support/Claude/claude_desktop_config.json`
- **Windows** — `%APPDATA%\Claude\claude_desktop_config.json`
```json
{
"mcpServers": {
"kortex": {
"command": "npx",
"args": [
"-y",
"mcp-remote",
"https://mcp.kortex-notebooklm.com/PLACEHOLDER-AT-LAUNCH",
"--header",
"Authorization: Bearer kx_mcp_your_key_here"
]
}
}
}
```
Restart Claude Desktop. Kortex appears under the tools icon in the composer.
ChatGPT reaches MCP servers through **developer mode**, which is off until you turn it on.
#### Turn developer mode on
**Settings → Security and login → Developer mode**. ChatGPT marks it _elevated risk_ because it lets you add connectors OpenAI has not reviewed — which is what a private endpoint like yours is.
 #### Add Kortex as an MCP app
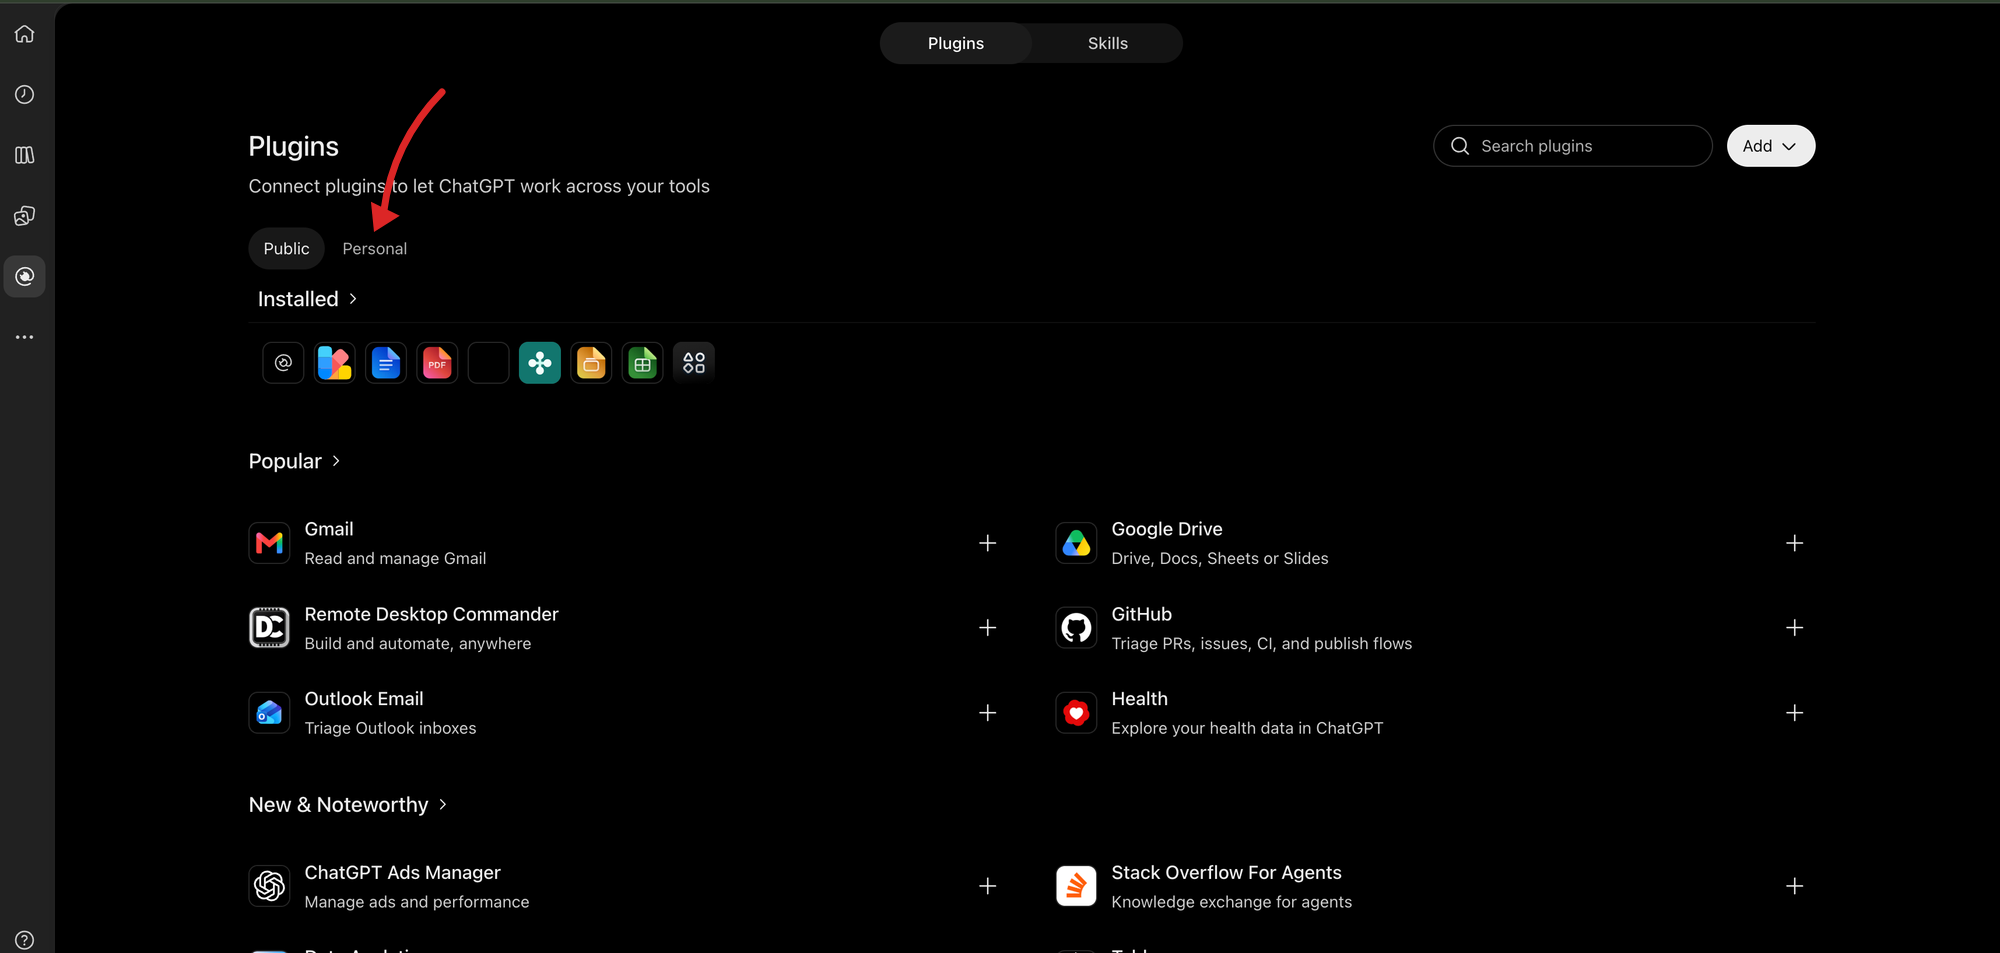
Open **Plugins** and switch to the **Personal** tab. Public is OpenAI's reviewed directory; yours lives under Personal.
#### Add Kortex as an MCP app
Open **Plugins** and switch to the **Personal** tab. Public is OpenAI's reviewed directory; yours lives under Personal.
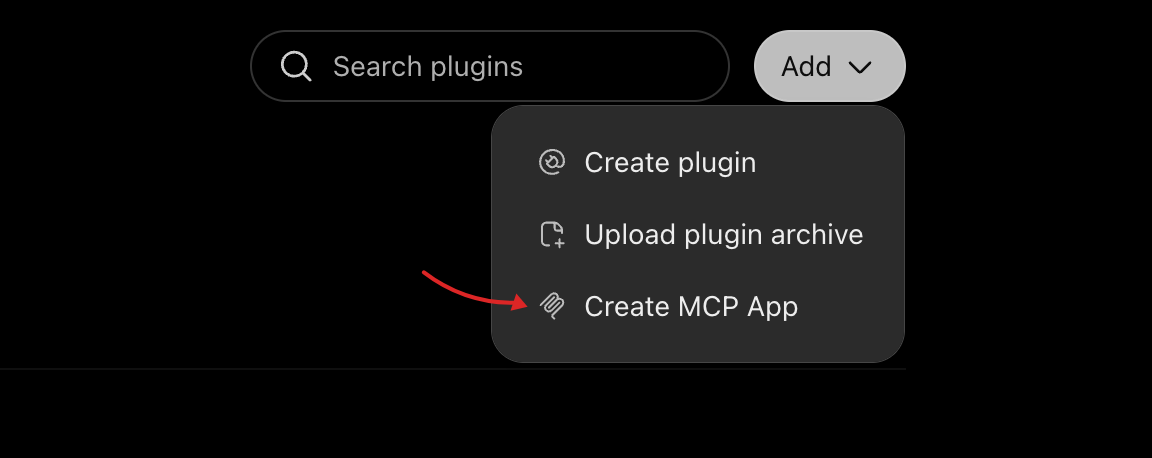
 Then **Add → Create MCP App**.
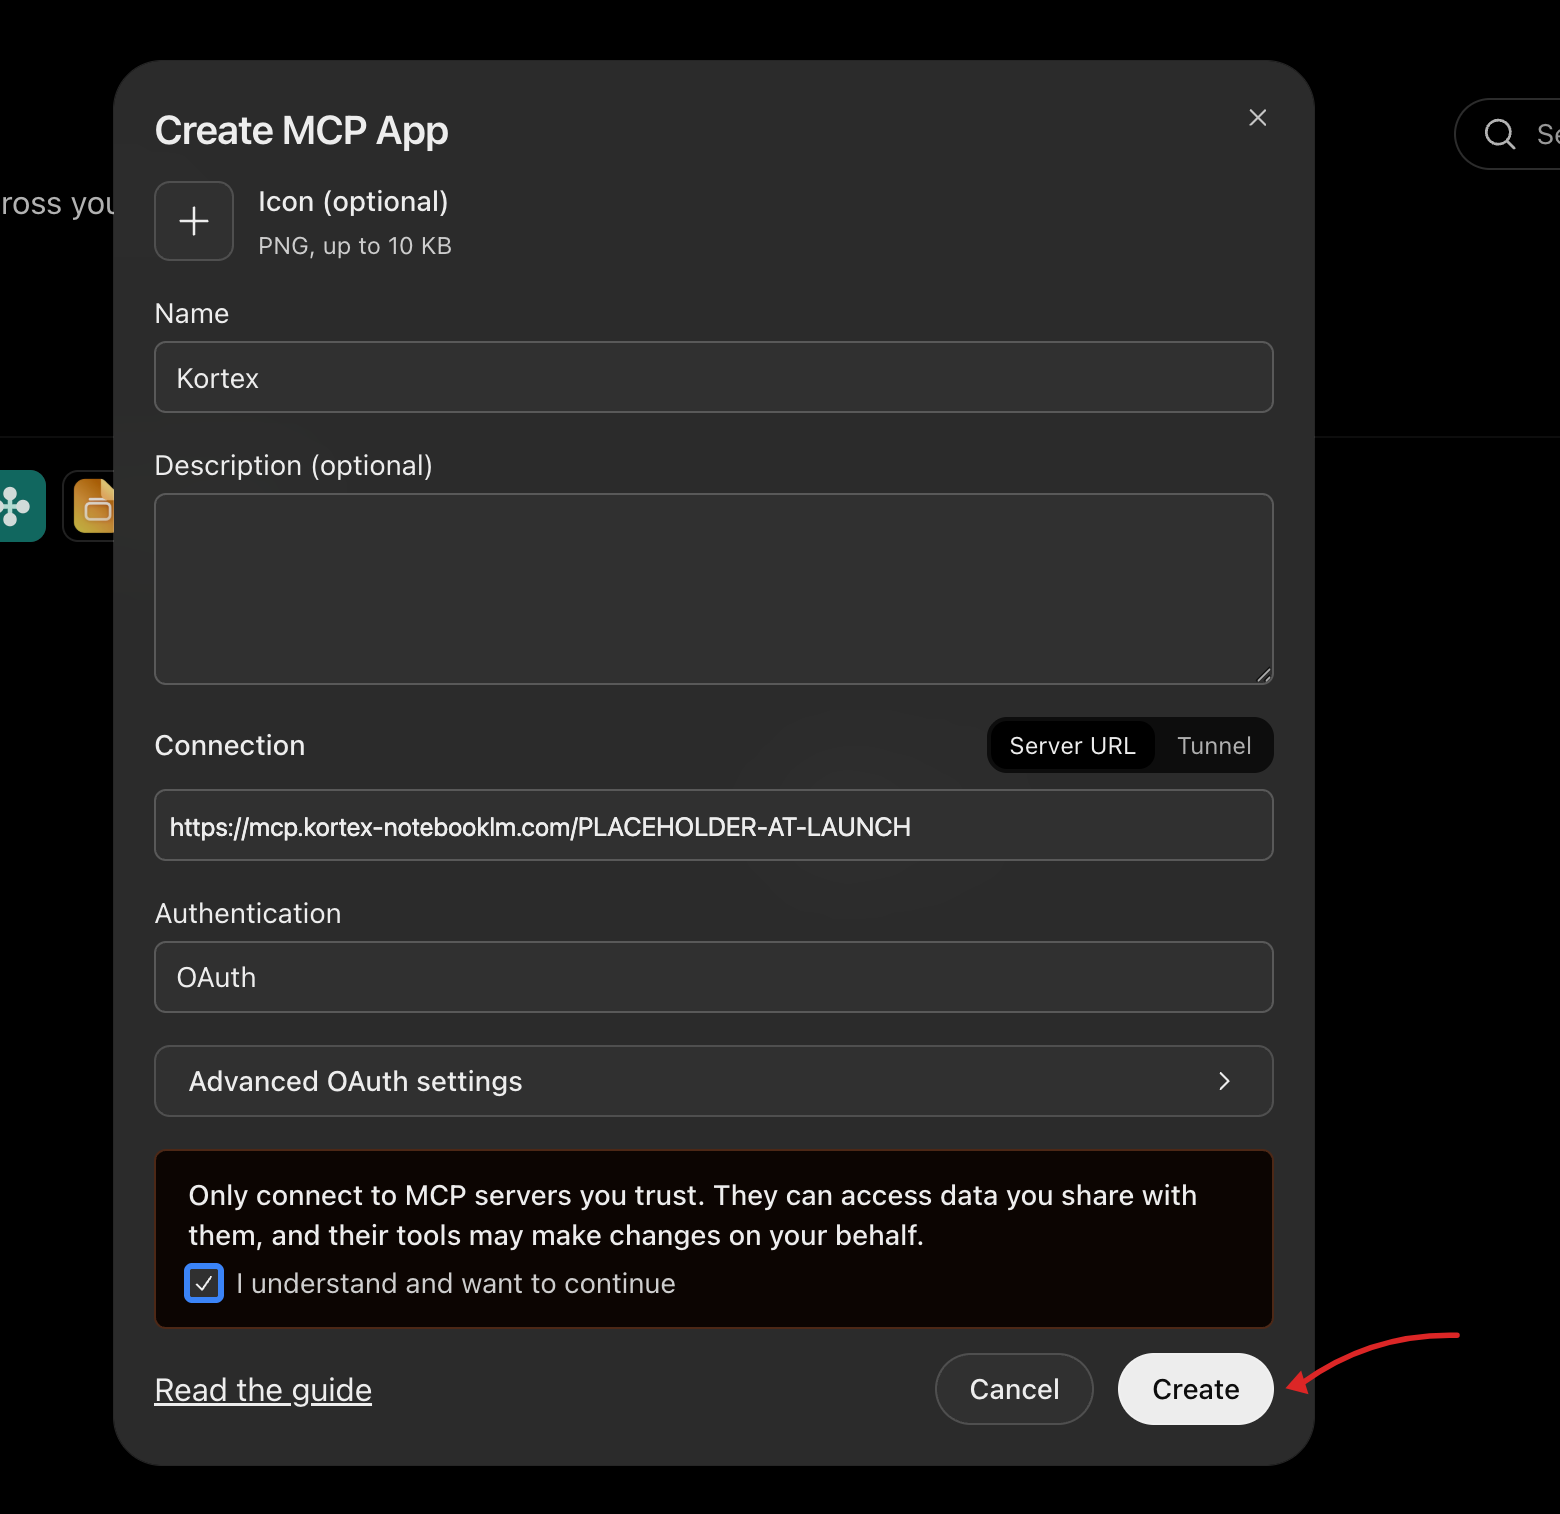
 Fill the dialog in: **Name** `Kortex`, **Connection** left on **Server URL** with the endpoint below, and **Authentication** set to **OAuth**. Tick the box acknowledging the warning, then **Create** — ChatGPT sends you to a Kortex consent page to sign in.
```
https://mcp.kortex-notebooklm.com/PLACEHOLDER-AT-LAUNCH
```
Fill the dialog in: **Name** `Kortex`, **Connection** left on **Server URL** with the endpoint below, and **Authentication** set to **OAuth**. Tick the box acknowledging the warning, then **Create** — ChatGPT sends you to a Kortex consent page to sign in.
```
https://mcp.kortex-notebooklm.com/PLACEHOLDER-AT-LAUNCH
```
 Add this to `.cursor/mcp.json` in your project, or `~/.cursor/mcp.json` to enable it everywhere:
```json
{
"mcpServers": {
"kortex": {
"url": "https://mcp.kortex-notebooklm.com/PLACEHOLDER-AT-LAUNCH",
"headers": {
"Authorization": "Bearer kx_mcp_your_key_here"
}
}
}
}
```
Cursor picks the file up immediately; check **Settings → MCP** for a green indicator.
Add this to `.vscode/mcp.json` in your workspace. The `inputs` block means VS Code prompts for the key once and stores it in the OS keychain, instead of you committing it to a file:
```json
{
"inputs": [
{
"type": "promptString",
"id": "kortex-key",
"description": "Kortex MCP API key",
"password": true
}
],
"servers": {
"kortex": {
"type": "http",
"url": "https://mcp.kortex-notebooklm.com/PLACEHOLDER-AT-LAUNCH",
"headers": {
"Authorization": "Bearer ${input:kortex-key}"
}
}
}
}
```
Open the Command Palette and run **MCP: List Servers → kortex → Start Server**, then paste the key when prompted.
Antigravity has an MCP Store, but Kortex is not in it — a private endpoint goes into the config file by hand.
1. Click **…** at the top of the editor's agent side panel and choose **MCP Servers**.
1. Click **Manage MCP Servers**, then **View raw config**.
1. Add Kortex to `mcpServers`:
```json
{
"mcpServers": {
"kortex": {
"serverUrl": "https://mcp.kortex-notebooklm.com/PLACEHOLDER-AT-LAUNCH"
}
}
}
```
That is the whole entry. Kortex registers clients dynamically, so Antigravity signs itself up and opens a consent page the first time it connects — no client ID to create, no key to paste.
The file is `~/.gemini/config/mcp_config.json` globally, or `.agents/mcp_config.json` to enable it in one workspace only.
:::warning
The URL key must be `serverUrl`. Antigravity dropped `url` and `httpUrl` when it split MCP out of the old Gemini CLI settings file, and a config still using either is ignored rather than rejected — the server simply never appears.
:::
#### With an API key instead
Add a `headers` object. Same URL; the header is what selects the key path:
```json
{
"mcpServers": {
"kortex": {
"serverUrl": "https://mcp.kortex-notebooklm.com/PLACEHOLDER-AT-LAUNCH",
"headers": {
"Authorization": "Bearer kx_mcp_your_key_here"
}
}
}
}
```
#### Holding tools back
Antigravity's own `disabledTools` keeps named tools away from the model — the same job Claude's per-tool permissions do, and worth pointing at the destructive ones:
```json
"disabledTools": ["delete_notebook", "delete_sources", "delete_artifact"]
```
It sits alongside, not instead of, a narrow [key profile](/docs/mcp-api-key) — that one is enforced by Kortex, this one by your editor.
Add this to `~/.codeium/windsurf/mcp_config.json`:
```json
{
"mcpServers": {
"kortex": {
"serverUrl": "https://mcp.kortex-notebooklm.com/PLACEHOLDER-AT-LAUNCH",
"headers": {
"Authorization": "Bearer kx_mcp_your_key_here"
}
}
}
}
```
Open **MCP Servers → Configure MCP Servers** in the Cline panel and add:
```json
{
"mcpServers": {
"kortex": {
"url": "https://mcp.kortex-notebooklm.com/PLACEHOLDER-AT-LAUNCH",
"headers": {
"Authorization": "Bearer kx_mcp_your_key_here"
}
}
}
}
```
Add this to `~/.codex/config.toml`:
```toml
[mcp_servers.kortex]
command = "npx"
args = [
"-y",
"mcp-remote",
"https://mcp.kortex-notebooklm.com/PLACEHOLDER-AT-LAUNCH",
"--header",
"Authorization: Bearer kx_mcp_your_key_here"
]
```
Open `settings.json` from the command palette and add:
```json
{
"context_servers": {
"kortex": {
"command": {
"path": "npx",
"args": [
"-y",
"mcp-remote",
"https://mcp.kortex-notebooklm.com/PLACEHOLDER-AT-LAUNCH",
"--header",
"Authorization: Bearer kx_mcp_your_key_here"
]
}
}
}
}
```
## Any other MCP client
If your client supports remote MCP servers, give it these two values:
| Setting | Value |
| --- | --- |
| Transport | HTTP (Streamable HTTP) |
| URL | `https://mcp.kortex-notebooklm.com/PLACEHOLDER-AT-LAUNCH` |
| Header | `Authorization: Bearer kx_mcp_your_key_here` |
If it only supports local commands, wrap the endpoint with `npx -y mcp-remote --header "Authorization: Bearer …"`, as in the Claude Desktop tab above.
## Choosing an account
If you use Kortex with more than one Google account, call `list_accounts` and pass the returned email as the `account` argument on any tool. Leaving it out uses your default account, and no tool call ever changes the account selected in the dashboard.
Add this to `.cursor/mcp.json` in your project, or `~/.cursor/mcp.json` to enable it everywhere:
```json
{
"mcpServers": {
"kortex": {
"url": "https://mcp.kortex-notebooklm.com/PLACEHOLDER-AT-LAUNCH",
"headers": {
"Authorization": "Bearer kx_mcp_your_key_here"
}
}
}
}
```
Cursor picks the file up immediately; check **Settings → MCP** for a green indicator.
Add this to `.vscode/mcp.json` in your workspace. The `inputs` block means VS Code prompts for the key once and stores it in the OS keychain, instead of you committing it to a file:
```json
{
"inputs": [
{
"type": "promptString",
"id": "kortex-key",
"description": "Kortex MCP API key",
"password": true
}
],
"servers": {
"kortex": {
"type": "http",
"url": "https://mcp.kortex-notebooklm.com/PLACEHOLDER-AT-LAUNCH",
"headers": {
"Authorization": "Bearer ${input:kortex-key}"
}
}
}
}
```
Open the Command Palette and run **MCP: List Servers → kortex → Start Server**, then paste the key when prompted.
Antigravity has an MCP Store, but Kortex is not in it — a private endpoint goes into the config file by hand.
1. Click **…** at the top of the editor's agent side panel and choose **MCP Servers**.
1. Click **Manage MCP Servers**, then **View raw config**.
1. Add Kortex to `mcpServers`:
```json
{
"mcpServers": {
"kortex": {
"serverUrl": "https://mcp.kortex-notebooklm.com/PLACEHOLDER-AT-LAUNCH"
}
}
}
```
That is the whole entry. Kortex registers clients dynamically, so Antigravity signs itself up and opens a consent page the first time it connects — no client ID to create, no key to paste.
The file is `~/.gemini/config/mcp_config.json` globally, or `.agents/mcp_config.json` to enable it in one workspace only.
:::warning
The URL key must be `serverUrl`. Antigravity dropped `url` and `httpUrl` when it split MCP out of the old Gemini CLI settings file, and a config still using either is ignored rather than rejected — the server simply never appears.
:::
#### With an API key instead
Add a `headers` object. Same URL; the header is what selects the key path:
```json
{
"mcpServers": {
"kortex": {
"serverUrl": "https://mcp.kortex-notebooklm.com/PLACEHOLDER-AT-LAUNCH",
"headers": {
"Authorization": "Bearer kx_mcp_your_key_here"
}
}
}
}
```
#### Holding tools back
Antigravity's own `disabledTools` keeps named tools away from the model — the same job Claude's per-tool permissions do, and worth pointing at the destructive ones:
```json
"disabledTools": ["delete_notebook", "delete_sources", "delete_artifact"]
```
It sits alongside, not instead of, a narrow [key profile](/docs/mcp-api-key) — that one is enforced by Kortex, this one by your editor.
Add this to `~/.codeium/windsurf/mcp_config.json`:
```json
{
"mcpServers": {
"kortex": {
"serverUrl": "https://mcp.kortex-notebooklm.com/PLACEHOLDER-AT-LAUNCH",
"headers": {
"Authorization": "Bearer kx_mcp_your_key_here"
}
}
}
}
```
Open **MCP Servers → Configure MCP Servers** in the Cline panel and add:
```json
{
"mcpServers": {
"kortex": {
"url": "https://mcp.kortex-notebooklm.com/PLACEHOLDER-AT-LAUNCH",
"headers": {
"Authorization": "Bearer kx_mcp_your_key_here"
}
}
}
}
```
Add this to `~/.codex/config.toml`:
```toml
[mcp_servers.kortex]
command = "npx"
args = [
"-y",
"mcp-remote",
"https://mcp.kortex-notebooklm.com/PLACEHOLDER-AT-LAUNCH",
"--header",
"Authorization: Bearer kx_mcp_your_key_here"
]
```
Open `settings.json` from the command palette and add:
```json
{
"context_servers": {
"kortex": {
"command": {
"path": "npx",
"args": [
"-y",
"mcp-remote",
"https://mcp.kortex-notebooklm.com/PLACEHOLDER-AT-LAUNCH",
"--header",
"Authorization: Bearer kx_mcp_your_key_here"
]
}
}
}
}
```
## Any other MCP client
If your client supports remote MCP servers, give it these two values:
| Setting | Value |
| --- | --- |
| Transport | HTTP (Streamable HTTP) |
| URL | `https://mcp.kortex-notebooklm.com/PLACEHOLDER-AT-LAUNCH` |
| Header | `Authorization: Bearer kx_mcp_your_key_here` |
If it only supports local commands, wrap the endpoint with `npx -y mcp-remote --header "Authorization: Bearer …"`, as in the Claude Desktop tab above.
## Choosing an account
If you use Kortex with more than one Google account, call `list_accounts` and pass the returned email as the `account` argument on any tool. Leaving it out uses your default account, and no tool call ever changes the account selected in the dashboard.