
How to tag and label sources in NotebookLM (Gemini Notebook)

2 minutes 6 steps Updated

Quick answer

Install the Kortex extension and open the Kortex Workspace. Choose Sources and tick the sources you want. Click Tags, then pick a tag or type a new name. Later, filter by that tag.

Watch it first

How to tag and label sources in NotebookLM (Gemini Notebook)
Read the transcript

Here's how to tag sources from Gemini Notebook, formerly NotebookLM, in the Kortex Workspace, and then filter by tag. Open the Workspace with the Dashboard button in the side panel, then choose Sources. It shows every source from all your notebooks.

Tick each source you want to label. The search box and the filters help you find them. Click Tags in the toolbar, and pick a tag you've already made.

Click Filter to show only sources with a tag. Tags also show in the Tags column. Notebooks have their own tags.

In Notebooks, tick rows and choose Tags the same way. To rename, delete or create tags in one place, open Manage Space in the sidebar. It holds notebook, source and artifact tags.

Tag your sources, then find them by tag.
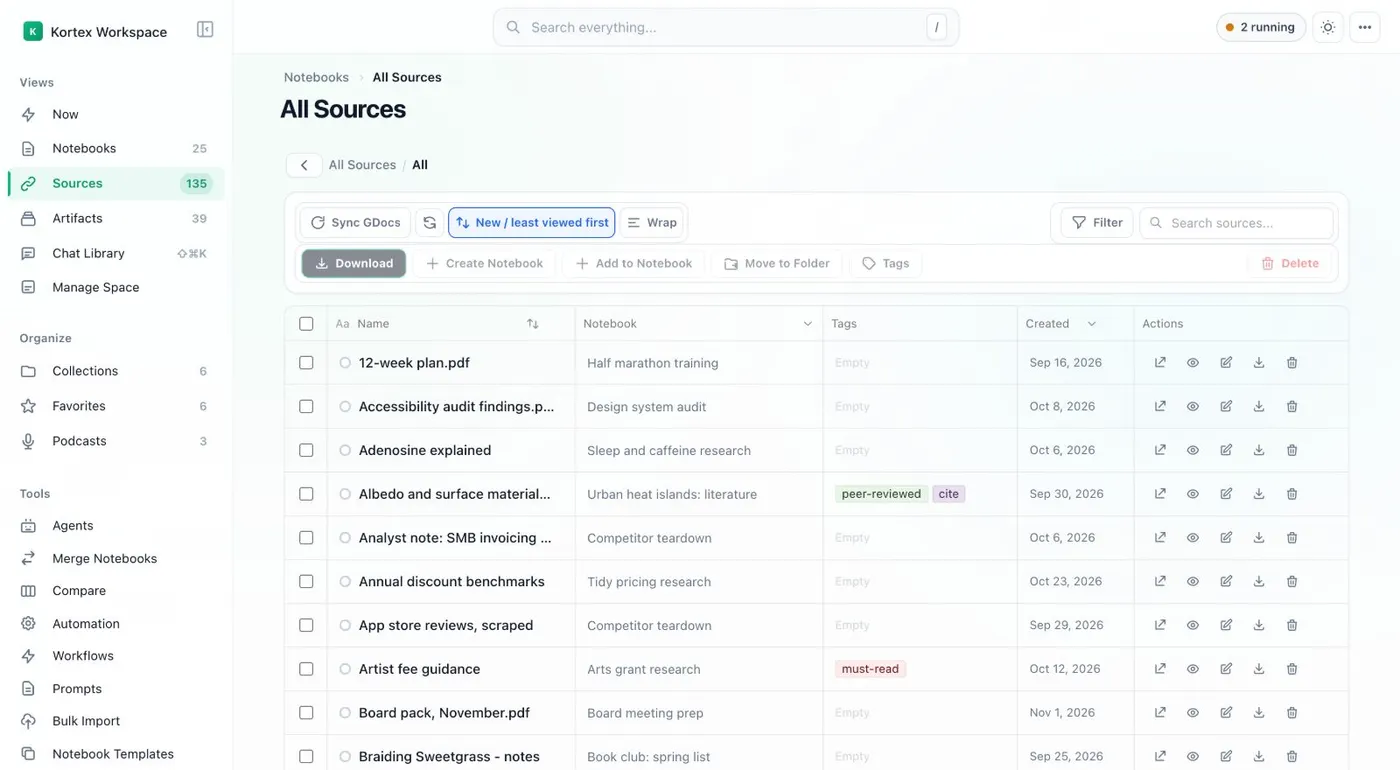
  1. Open the Sources view

    Click the dashboard button in the side panel header to open the Kortex Workspace. Choose Sources in the sidebar. It lists every source from all your notebooks.

    The All Sources table in the Kortex Workspace with each source's type, notebook, tags and folder.
    Every source across your notebooks, with its tags and folder.
  2. Select the sources

    Tick the checkbox on each source you want to label. To find them first, use the search box or the filters at the top of the table.

  3. Choose Tags

    Click Tags in the toolbar. Pick a tag you have already made, or type a new name to create one.

  4. Filter by the tag

    Click Filter to show only sources with a tag. The tags also show in the Tags column of the table.

  5. Tag whole notebooks too

    Notebooks have their own tags. In the Notebooks view, tick rows and choose Tags the same way.

  6. Rename or delete a tag everywhere

    Open Manage Space in the sidebar. There you can rename, delete and create notebook, source and artifact tags in one place.

If it doesn’t work

My tags are missing on another computer
Check that you are signed in to Kortex with the same account on both computers. Then reload the Workspace.
I cannot find Manage Space
Manage Space is in the Workspace sidebar, under Views. Click the dashboard button in the side panel's header to open the Kortex Workspace. Then look for it there.
The Sources view is empty
Reload the Workspace and check that you are signed in. If you use more than one Google account, check the Notebooks from switch at the bottom of the sidebar.

Questions people ask

Something we missed? Ask us.

Are notebook tags and source tags the same set?

No. Notebooks and sources have separate sets of tags. Manage Space shows both. You can rename or delete either one there.

Can I tag many sources at once?

Yes. Tick as many rows as you like. Then choose Tags once.

Do tags show up in Gemini Notebook itself?

Tags stay in Kortex and show in the Workspace. They are not Gemini Notebook's own labels.

Keep going

More tutorials

All tutorials

Do it on your own notebooks.

Install the Kortex extension and follow these steps on a notebook you already have.

100,000+ users, rated 4.5 on the Chrome Web Store.

Talk to the Kortex team

This opens a pre-filled email in Gmail. We usually reply within a day.