
How to merge NotebookLM (Gemini Notebook) notebooks

2 minutes 6 steps Updated

Quick answer

Install the Kortex extension and open the Kortex Workspace. Choose Merge Notebooks. Name the new notebook, tick the notebooks to combine and click Merge. Compare shows how two notebooks overlap before you merge.

Watch it first

How to merge NotebookLM (Gemini Notebook) notebooks
Read the transcript

Here's how to merge notebooks in Gemini Notebook, formerly NotebookLM, into one new notebook, with Kortex. Open the Kortex Workspace with the Dashboard button in the side panel. Then choose Merge Notebooks in the sidebar, under Tools.

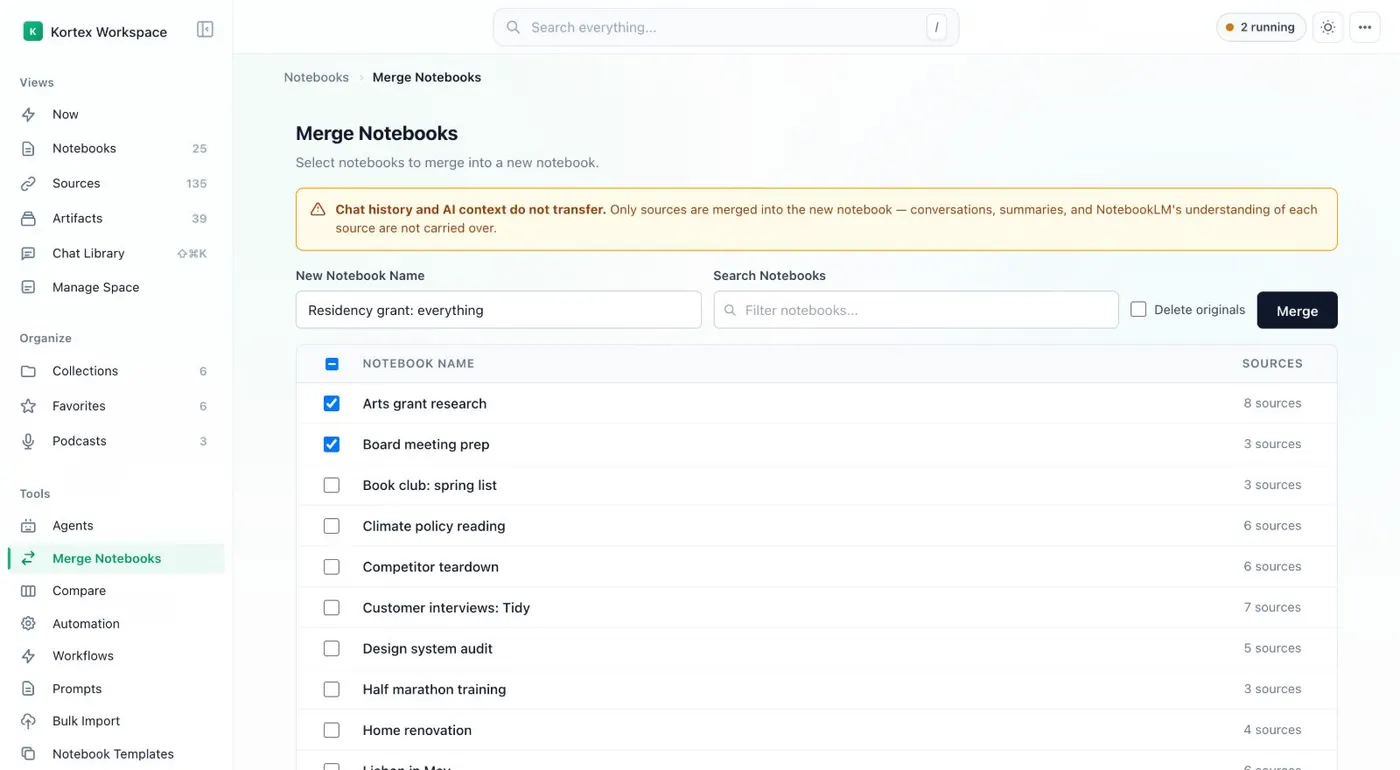
Type a name in New Notebook Name. The merge makes a new notebook, so pick a name that's different from the originals. Tick the notebooks to combine.

Use the filter box to find them. Switch on Delete originals only if you want to remove the old notebooks. If you're not sure, leave it off.

Click Merge and confirm. A merge can't be undone. When it finishes, Merge Complete shows the new notebook's name and its number of sources.

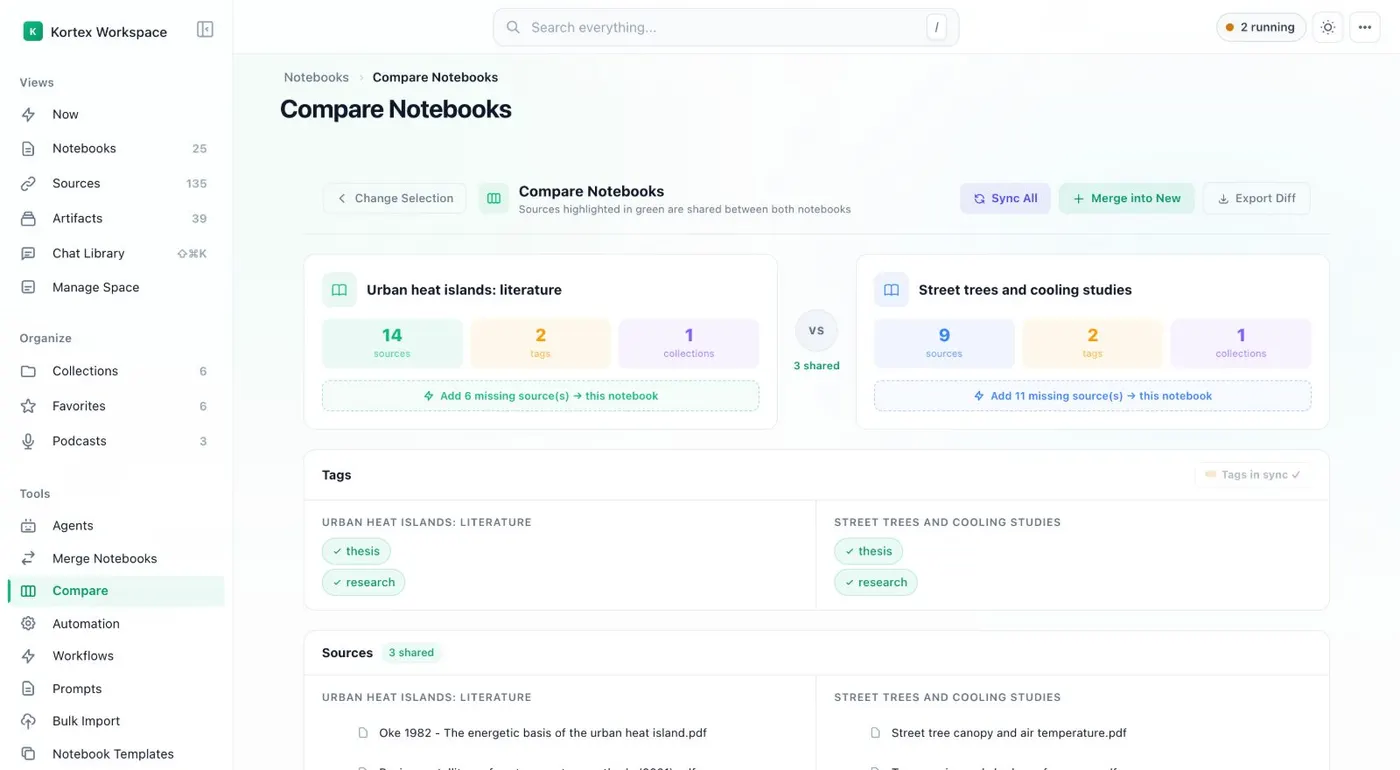
To see how two notebooks overlap first, tick two in the Notebooks table and choose Compare. Shared sources show in green. Merge your notebooks into one new notebook.
  1. Open Merge Notebooks

    Click the dashboard button in the side panel header to open the Kortex Workspace. Then choose Merge Notebooks in the sidebar, under Tools.

  2. Name the new notebook

    Type a name in New Notebook Name. The merge makes a new notebook. Pick a name that is different from the originals.

    Merge Notebooks in the Kortex Workspace: a name field for the new notebook, a Delete originals option and a list of notebooks with source counts to tick.
    Name the new notebook, tick the notebooks to add, and merge.
  3. Tick the notebooks

    Tick the notebooks to combine. Use the filter box to find them. Kortex shows how many sources the new notebook will have.

  4. Choose what happens to the originals

    Switch Delete originals on only if you want to remove the old notebooks. If you are not sure, leave it off. Check the new notebook, then delete the old ones yourself.

  5. Click Merge and confirm

    Click Merge and confirm. Kortex warns that you cannot undo a merge. When it finishes, a Merge Complete message shows the new notebook's name and its number of sources.

  6. Compare two notebooks first

    To see how two notebooks overlap before merging, tick two in the Notebooks table. Choose Compare, then Compare Selected. Shared sources show in green.

    Compare Notebooks: two notebooks side by side with counts of sources, tags and collections, shared sources in green, and Sync All, Merge into New and Export Diff buttons.
    Compare two notebooks: what they share and what only one has.

If it doesn’t work

The message says Merge Incomplete
Gemini Notebook limits how many sources a notebook can hold. Kortex lists the sources that did not fit. Keep the originals. Split the merge into smaller groups and try again.
I deleted the originals and want them back
You cannot undo a merge, so Kortex cannot bring back deleted originals. Keep Delete originals off until you have opened and checked the merged notebook.

Questions people ask

Something we missed? Ask us.

How many notebooks can I merge at once?

Tick as many as you need, but at least two. Before you click Merge, Kortex shows how many sources the new notebook will have.

Does merging change my original notebooks?

Not unless you switch on Delete originals. The merge creates a new notebook and leaves the others as they were.

What does Compare do?

It shows what two notebooks share, with source, tag and collection counts. You can copy over what only one has. It does not create a new notebook.

Keep going

More tutorials

All tutorials

Do it on your own notebooks.

Install the Kortex extension and follow these steps on a notebook you already have.

100,000+ users, rated 4.5 on the Chrome Web Store.

Talk to the Kortex team

This opens a pre-filled email in Gmail. We usually reply within a day.