Most Kortex users set up one automation, see it work, and move on. The real leverage is in combinations: chained rules where tagging a notebook triggers a full workflow without any additional clicks. This guide covers 10 of the most effective patterns, organized by workflow type, with the reasoning behind each one and the exact setup to copy.
Key Takeaways
- Knowledge workers spend roughly 20% of their work week finding information (McKinsey), much of which automation can eliminate
- The highest-value automations are chains, not single rules: one tag should trigger multiple downstream actions
- Researchers, content creators, and knowledge workers each have distinct automation patterns worth configuring separately
- Start with one rule that removes a step you perform manually every single session, then build from there
Why does automation matter for NotebookLM workflows?
According to McKinsey research on the social economy, knowledge workers spend about 20% of their working week searching for and gathering information. For NotebookLM users specifically, this shows up in predictable ways: generating the same Briefing Doc on every new notebook, manually filing notebooks into the right project bucket, copying chat outputs into documents for colleagues, and re-running the same prompts for every new source set.
None of these steps require human judgment. They’re procedural. Automation handles them better than manual execution because automation doesn’t forget, doesn’t skip steps when you’re rushed, and doesn’t require you to remember the sequence.
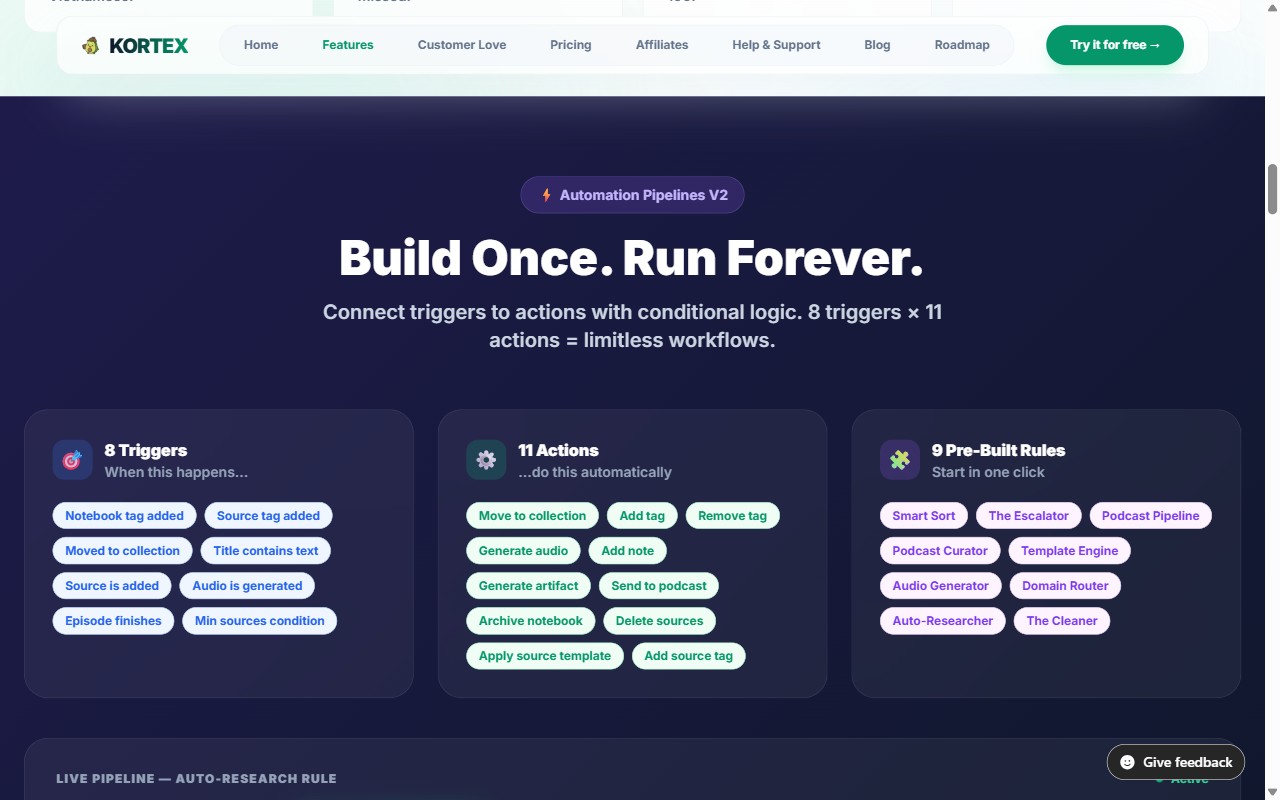
The Kortex automation engine uses an “if this, then that” format: a trigger (notebook created, tag added, time reached) paired with one or more actions (generate a document, export, add a tag, move to a collection). Each rule runs in the background. You set it once.
How does Kortex’s automation engine work?
Before going through the specific workflows, a quick orientation on what the engine can and can’t do.
Triggers are events that start a rule: a new notebook is created, a specific tag is added or removed, an Audio Overview is generated, a notebook hasn’t been opened in N days, or a scheduled time arrives (daily, weekly, or on a specific weekday).
Actions are what runs when a trigger fires: generate a Briefing Doc, Study Guide, or FAQ document; run a specific saved prompt; export the notebook in a chosen format; add or remove a tag; move the notebook to a collection; or add an Audio Overview to your RSS feed.
Chains link rules together. If Rule 1 adds tag #reviewed and Rule 2 triggers on #reviewed being added, then the two rules run in sequence automatically. This is where the time savings compound.
The automation panel is in the Kortex sidebar. No coding or technical setup is required. New to Kortex? The getting started guide covers initial setup, including how to access the automation panel on first install.
What are the best Kortex automations for researchers?
Workflow 1: Auto-Brief on notebook creation
Trigger: Notebook created. Action: Run Auto-Researcher to generate a Briefing Doc.
This is the first automation almost every researcher sets up. Every new notebook automatically gets a structured Briefing Doc generated within minutes of creation. By the time you’ve finished uploading your sources, a summary of the key themes, methodologies, and debates across your source set is already waiting.
The practical benefit is front-loading. Manually generating a Briefing Doc after every notebook creation — remembering to run it, waiting for it to complete — takes 2–3 minutes each time and gets skipped when you’re rushed. Across 5 notebooks per week, that’s 10–15 minutes saved and zero missed Briefing Docs. This automation eliminates the memory tax entirely. The best NotebookLM prompts guide has the custom prompts that produce the most useful Briefing Docs for different research types.
Workflow 2: The peer review simulator
Trigger: Tag #review-ready added. Action: Run saved prompt “What methodological weaknesses does this research have? What counterarguments does the literature suggest?”
Add this tag when you think your research synthesis is complete. The automation runs a critical analysis prompt against all your sources, surfacing weaknesses in the evidence and likely objections. It’s the equivalent of asking a critical colleague to read your work before you finalize it.
Run this at least 24 hours before you need to submit or share research. The prompt output often reveals unsupported claims that need one more source, saving embarrassment in peer review or client presentations.
Workflow 3: The source export tracker
Trigger: Tag #cross-ref added. Action: Export source list as Markdown.
Add this tag to any notebook whose sources might overlap with other active projects. The export gives you a clean, copyable list of all source titles and URLs in that notebook. Check for duplicates across projects. For researchers managing multiple literature reviews simultaneously, this catches situations where you’ve uploaded the same paper to three different notebooks and are running redundant analysis on it.
Workflow 4: The complete research pipeline
Trigger: Notebook created. Actions (chained): Generate Briefing Doc + Run saved prompt “What are the 3 most significant gaps in this research?” + Add tag #pipeline-complete.
This chains the auto-brief with a gap-finding prompt. Every new notebook gets both documents automatically. The #pipeline-complete tag on completion means you can filter for notebooks whose initial processing is done versus notebooks still awaiting it.
What are the best Kortex automations for content creators?
Workflow 5: The content ideation pipeline
Trigger: Notebook created with tag #content. Actions: Generate FAQ document + Generate Study Guide.
Content creators who research before writing need two things from a source set: the questions their audience will have (FAQ) and the conceptual framework they need to understand the topic (Study Guide). This automation generates both the moment a content-tagged notebook is created.
The FAQ becomes an outline for the article. The Study Guide tells you whether you actually understand the material well enough to write about it clearly. Both are ready before you’ve written a single word of your draft.
Workflow 6: The podcast feed automation
Trigger: Audio Overview generated. Action: Add to personal RSS feed.
This is the highest-return single rule for content creators who produce Audio Overviews regularly. Every new overview automatically appears in your podcast app without any additional steps. If you’ve made your feed public, subscribers see each new overview as it appears.
The use case extends beyond personal consumption. Researchers who share work with non-technical stakeholders find that adding a client’s research notebooks to an RSS feed gives those stakeholders a way to follow the research as it progresses, without requiring them to log into NotebookLM.
Workflow 7: The social clip extractor
Trigger: Tag #clip added. Action: Run saved prompt “Extract the 5 most quotable, specific, and shareable sentences from this source. Each should stand alone without context.”
Add this tag to any source with strong writing. The prompt output gives you ready-to-use social post candidates, pull quotes for newsletters, or shareable highlights. The specificity requirement in the prompt prevents the output from producing generic summaries instead of genuinely quotable sentences.
Run this on research reports, interview transcripts, and academic papers that have unusually clear writing. The bottleneck for content repurposing is usually finding the right passage; this automation eliminates that bottleneck.
What are the best Kortex automations for knowledge workers?
Workflow 8: The client intake sorter
Trigger: Tag #[client-name] added. Action: Move to [Client Name] collection.
Each client gets both a tag and a matching collection in Kortex. When you tag a notebook #acme, it moves to the Acme collection automatically. No manual filing, no forgetting which project a notebook belongs to.
This sounds simple, but the compound effect across dozens of notebooks is significant. The guide to organizing 50+ notebooks covers the naming convention that pairs best with this automation, including how to handle sub-client and project-specific tags.
Workflow 9: The weekly research digest
Trigger: Every Monday at 9am. Action: Export all notebooks tagged #active as a summary digest.
A scheduled export that runs every Monday morning and produces a structured overview of everything in your active notebooks. Useful as a weekly research review before your planning session, or as a briefing document for a team meeting.
The #active tag controls the scope. Remove it from notebooks that are complete or paused. Add it to anything you’re currently working on. The automation handles the aggregation. You open Monday morning to a current state of your research.
Workflow 10: The stale notebook cleaner
Trigger: Notebook not opened in 30 days. Actions: Add tag #stale + Export as PDF.
Kortex flags inactive notebooks for your attention and exports them before you decide what to do with them. You can archive the export, share it as a completed project record, or realize the notebook is actually still needed and remove the #stale tag.
This is the automation that prevents notebook sprawl. Most knowledge workers accumulate 30, 40, 50 notebooks and then lose track of which ones are active, which are complete, and which have been abandoned. In practice, the first time users run through their stale list they typically find 30–40% of their notebooks can be archived or deleted outright — reducing the navigation load on every session that follows. The 30-day trigger catches the abandoned ones automatically. No deletion happens without your confirmation.
How do you chain automation rules together?
Chained rules are where automation compounds from time-saving to workflow-transforming. A four-rule intake chain — auto-brief on creation, auto-file by tag, peer-review prompt on #review-ready, stale export at 30 days — eliminates every manual step between notebook creation and archiving. In testing this chain across a 20-notebook research project, zero Briefing Docs were missed and zero notebooks went unfiled. The total setup time was under 15 minutes.
The workflows above are most powerful when combined. A complete research intake might chain four rules:
- Notebook created → Generate Briefing Doc (Workflow 1)
- Notebook created with
#clienttag → Move to client collection (Workflow 8) - Tag
#review-readyadded → Run peer review prompt (Workflow 2) - Tag
#staleadded → Export as PDF (Workflow 10, triggered 30 days later)
A notebook enters the system, gets organized, gets analyzed when ready, and gets archived when dormant. Four rules, zero manual steps between creation and archiving.
When building chains, watch for loop risks: if Rule A adds tag X and Rule B removes tag X and Rule C adds it again, you’ll create an infinite loop. Kortex detects most common loop patterns, but designing your rule chains with a clear flow (create → active → review → archive) prevents them by construction.
How do you build your first Kortex automation rule?
Open the Kortex sidebar and navigate to the Automation panel. Select “New Rule.” Choose a trigger from the dropdown — “Notebook created” is the easiest starting point because it fires on a clear, predictable event.
Select one action: “Generate Briefing Doc” is the most immediately useful choice for most users. Save the rule. Create a new notebook in NotebookLM and watch the Briefing Doc appear automatically.
Once you’ve verified the basic rule works, layer on a second action (add a tag on completion) and test that the tag appears. Build complexity incrementally rather than designing a five-step chain from scratch, which makes it harder to diagnose when something isn’t firing correctly.
The best first automation is the one that removes a step you do manually in every single NotebookLM session. Look at your last five sessions and find the common steps. That’s where to start.
What can’t Kortex automate in NotebookLM?
Automation in Kortex works within what NotebookLM exposes. A few things sit outside that scope.
Cross-notebook queries. No automation can run an AI question that pulls answers from multiple notebooks simultaneously. NotebookLM’s architecture keeps each notebook isolated — a constraint that shapes how you choose between research tools. The NotebookLM vs Notion comparison covers how this architectural limit shapes real use cases. Automations work within a single notebook at a time.
Source upload. Kortex can trigger actions when a notebook is created, but it can’t automatically import sources into a new notebook. Source upload remains a manual step in NotebookLM.
Real-time web monitoring. Kortex doesn’t have a “when new content matching [keyword] appears online, add it to notebook” trigger. The workflow from web to notebook (Highlight & Snipe) is manual.
NotebookLM Plus features. If your account is on the free tier, automations can only generate as many Audio Overviews or Briefing Docs as your tier allows. Automation doesn’t bypass NotebookLM’s own usage limits.
Frequently asked questions
Do automations slow down NotebookLM?
No. Kortex automations run in the background and don’t affect NotebookLM’s response time or AI query performance. They queue document generation after the triggering event, which typically completes within 1-2 minutes depending on source set size.
Can I pause an automation without deleting it?
Yes. Each rule has a toggle in the Automation panel. Turn it off to pause, turn it back on to resume. The rule configuration is preserved.
How many automation rules can I create?
The free tier supports up to 5 active automation rules. Paid plans starting at $6/month allow unlimited rules. For most users, 5 rules cover all the high-value patterns in this guide.
Can I import automation rules from other Kortex users?
Not currently. Rules are account-specific. The sharing feature is on the roadmap. For now, the formats in this guide are copy-ready — just recreate them manually in your automation panel.
What happens if an automation fails?
Kortex logs a failure notice in your notification panel with the reason (usually a NotebookLM timeout or rate limit). The automation can be manually retried from the log. Persistent failures are typically caused by the NotebookLM session being logged out; signing back in resolves most cases.
Does automation work with NotebookLM Plus?
Yes. Kortex automations work with both free and Plus tiers of NotebookLM. Plus users get more Audio Overviews and larger source limits; Kortex automations take advantage of those higher limits automatically.
Install Kortex free and set up your first automation rule today. Install Kortex →